For more Fairy Tail character tutorials click here
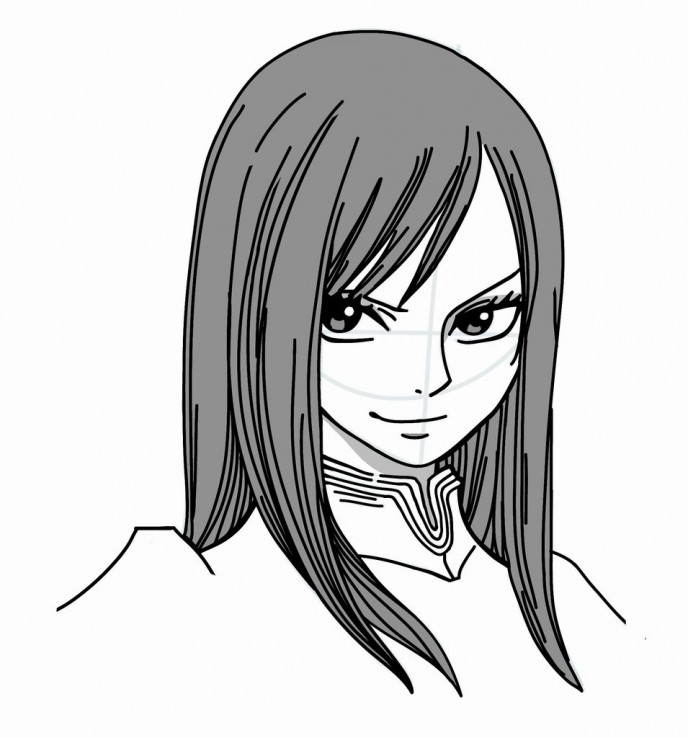
Hey everyone! Check out our newest tutorial, requested by user dekko, Erza Scarlet from Fairy Tail. Erza is quite a serious girl, just make sure you don’t make her angry as she’s an S-Class mage and can really work some magic. Erza is fairly easy to draw and is recommended for all levels of manga drawers. If you’ve missed any of our other Fairy Tail tutorials, just click on the Fairy Tail tag in the cloud tag on the right side of the page to see all of them including Natsu and Happy. Keep your requests coming by posting your request in the request tutorial section of the website. Just be sure to search for your character first, as we might already have a tutorial on the guy or gal you want and preference will be given to new characters. You might want to have a grey marker handy as we’ll be doing some shading at the very end of today’s tutorial. Let’s get our materials ready and learn how to draw Erza.
Step 1
Step 01: Just a reminder to all of our mangakas that all of the blue lines you see in this tutorial are only construction lines and will be erased later on, so don’t press too hard on your pencil when drawing these lines. Our final lines you’ll see in black at the end of the tutorial. We’ll start with our head circle, center and eye lines.
Pro tip 1: Start with a large circle for the head in the upper center of your paper. Go around a few times to get a nice outline of a circle, as it can be quite hard to draw a circle free hand. Then trace your head circle over the outline you have made.
Next, we’ll draw our center line which is situated just to the right of center of the head circle and titled at a very slight angle. It should extend both slightly above and below the head circle. Then, we’ll draw our horizontal eye line about a quarter of the way up the head circle. It, too, should extend out just past the head circle.

Step 2
Step 02: Outlines of the eyes, nose and jaw line in this step. We can begin by drawing the jaw line. It starts on the left where the eye line touches the head circle, comes down to the center line and then back up to where the eye line and head circle meet on the right. The chin, though rounded, should be a little pointy. Next, we’ll draw the top of the eyes using the eye line as our base. Draw the eye on the left like a leaf shape. The eye on the right is similar but it isn’t such a smooth curving line. It looks a bit more like a diamond. Lastly, we’ll draw the nose between the eye line and the bottom of the head circle just to the right of the center line.

Step 3
Step 03: We’re going to do an outline of Erza’s bangs in this step and add some facial features. You should start with the hair outline. It’s made up of three lines. Start on the left with the near vertical line that just overlaps the eye on the left. Jump over to where the eye line meets the head circle and draw the upside down “V” shape. When you’ve got those two lines, just add a line over the eye on the left to connect them. Then, inside the eyes we’ll add the half circle for the pupils using the eye line as the base. Notice that in the eye on the left, the pupil stops at the hair line we just drew. Draw the lines for the lower lids of the eyes, but be sure leave some space empty in the inner corners of her eyes. Next, extend the nose line above the eye on the right to touch the hair outline. This’ll be for her eyebrow. Moving down, add the dot for the nostril to her nose. And lastly, we’ll draw the two lines for her mouth. Both lines should be more on the left side of the center line than the right and you’ll notice the top line curves up at the end on the left.

Step 4
Step 04: We’re gonna zoom in on Erza’s eyes to do a little detail work. Inside the pupils of the eyes, we’ll draw some reflection spots. In the bottom of the pupil we’ll draw a “M” like shape with soft arches. Then, we’ll draw the small circle in the upper right of the pupil. Above the inner corner of each eye we’ll draw a line for the upper lid and then we’ll add some eyelashes. Once you’ve got that we’ll move on.

Step 5
Step 05: Time for some hair segments and Erza’s neck. We’ll start with the hair segment on the right. It starts up on the center line above the head, comes down and touches the end of the eye line, goes further down, comes to a point, and then back up to touch the cheek. On the right, we’ll use the line we drew in step 3 that overlaps the eye on the left as part of the hair segment. We’ll extend that line up a little further into the middle of the head. Then we’ll extend it down below the head circle to a point and then back up to stop outside of the head circle on the left about 3/4’s of the way up the head circle. NOTE: Both of the tips of these hair segments should point to the right. Next, we’ll draw a very short line just to the right of the chin and then the curving neck line that touches the hair segment on the left. And that’s it for this step.

Step 6
Step 06: We’ve got a little hair to add and then we’ll work on Erza’s armor. To begin, you can draw the hair spikes on her forehead that just touch the eye brow on the left. Then we’ll move down and focus on the area that is between the hair segments first. If you look closely, there’s a small squished “U” like shape just under the center line below the neck and then there’s a larger “Y” like shape. The easiest way to draw this is to draw the line from the neck, then curving down and touching the hair segment on the right. Then draw the squished “U” and then the “Y” shape. Be sure to leave enough space between the “U” and the “Y” as we will want to draw some more lines between them. When you’ve got that, you can add the hair spike coming off the hair segment on the left. Once all that’s in place you can draw the shoulder on the left and the shoulder line on the right that are outside the hair segments.

Step 7
Step 07: One more hair segment and some armor details in this step. You can start with the hair segment that begins at the top of the center line above the head and moves to the left, it comes down to touch the shoulder on the left, then add another line from the shoulder to the hair segment you’ve already drawn. Next, we’ll move down to the armor where we need to draw two parallel lines between the “U” and the “Y” shapes on the neck plate. Lastly, we’ll add the line across the armor at the bottom of the “Y”. Great work.

Step 8
Step 08: Now, in this step do your best to imitate the image you see above. All you have to do is add lines to the already drawn hair segments and bangs to add layers to the hair.
Pro tip: make sure to add lines between the two hair segments on the left where there looks like there’s a hole or blank space just above the shoulder. We should do the same to the area between the hair segment on the right and the neck armor.
Once you’ve got the hair lines in place we’ll add a couple more short horizontal lines to the neck plate and we’re ready to draw our final lines.

Step 9
Step 09: Use your eraser to lighten all of the construction lines you’ve made so far. Then, take out your finishing pen and trace your final lines. Get all your final lines in place and then we’ll work on line quality and filling. Pro tip: When doing your basic final lines notice the break in the top two lines of the neck armor, also be sure to leave the inner corners of the eyes empty. Once you have your final lines in place we’ll do some line quality work. This means we should thicken the lines slightly. I’ve thickened both the upper and lower lines of the eyes, the jaw line, especially on the right side, the shoulder on the left and the neck armor line on the right between the hair segments. This gives Erza more of a 3D feel. Before moving on, just fill in the pupils except for the little circle and the “M” shape. These are the reflection spots.

Step 10
Step 10: When your ink is completely dry, use your eraser to completely erase any remaining construction lines that you can see.

Step 11
For more Fairy Tail character tutorials click here
Step 11: For our final step, I’ve decided to do some shading. Using a grey marker or pencil shade in all of Erza’s hair and the “M” shape in the eyes. Also, I’ve shaded the area of her neck just under the chin. Give it a few minutes to dry and take a look.
You’ve just drawn the wizardly Erza Scarlett from Fairy Tail. If your goal is to become a great mangaka make sure to draw Erza again from memory. Then compare the final drawing with the original and correct any mistakes you might have made. Try once again from memory. This is the best way to build a huge library of shapes that you can use in the future for your own manga characters.
Draw with passion! -_^
Hiroshi


14 comments
Oh, I am sorry for the problems I will ask my friend that made the web to check it out!
Comments are closed.