

Click here for more One Piece tutorials
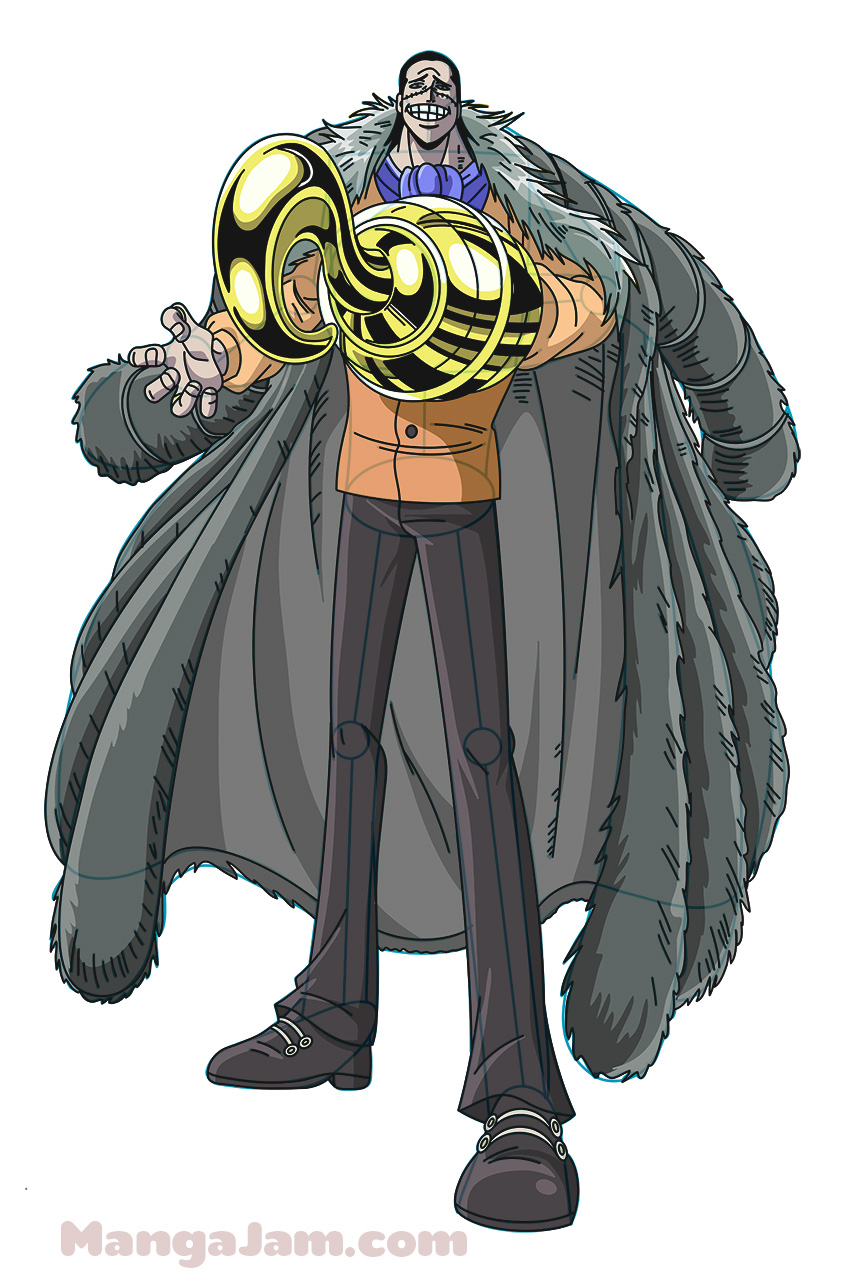
After being sick for a couple of days, I’m back and ready to draw now more than ever. How to Draw Manga in 3D is bringing you another awesome requested One Piece tutorial, this time it’s Whitebeard for Alathiir. Whitebeard, in case you don’t know already, is one of the strongest pirates of the high seas, no kidding, he’s like the Superman of One Piece. But unlike Superman, Whitebeard doesn’t have a cape and fancy tights but huge muscles and a colossal white crescent mustache. I hope everyone enjoys drawing him as much as I did. Check out more of our One Piece tutorials by clicking on the One Piece tag in the tag cloud on the right of the page and keep your requests coming!
Step 1
Step 1: All of the bluish green lines you see in the tutorial are only construction lines and will be erased later on, so don’t press too hard on your pencil. Our final lines will be in black towards the end of this tutorial.
We’re going to be starting a little differently than usual. Since Whitebeard’s head isn’t round but looks a bit like a can of beer or a horse face we won’t be drawing a head circle to begin. Instead we’ll start with our vertical center line and a horizontal jaw line in the center of our paper. We need to keep enough space to the left and right for Whitebeard’s massive Movember mustache and enough space below to add his neck. So, we’ll draw a vertical line in the center of our paper for the center line and a horizontal jaw line about the same length. Notice though that the jaw line is at an angle; it’s slightly higher on the right than on the left. You can also take this chance and make the small marks you see towards the end of our construction lines. These will help you in the next step to draw the outline of his head/face. The notches on the vertical line are farther away from the center than on the horizontal line. And the notches on the right and bottom are closer to the center than on the left and top.

Step 2
Step 2: Now, we have to draw Whitebeard’s head. The head is made up of 6 lines, three for the top and three for the bottom. The top of the head and the chin are flat/horizontal with the top of the head being wider than the chin. Using the notches we made in our construction lines in the last step as a guide we can draw the top of the head and then the flat chin line. Once you have those, just connect the ends to the notches we made on the horizontal jaw line in the previous step and you’ve got it.

Step 3
Step 03: We’ve got another construction line to draw here and a few features. Let’s jump right in. We’ll start with the eye line. It looks huge, doesn’t it? That’s because this line is not just for the eyes but will also mark the tips of Whitebeard’s signature stache. So, let’s draw a long horizontal eye line with notches on the end to mark the tips of the mustache. The line should be between the jaw line and the top of the head a little more than half way up. Since we’re up there, let’s add the “S” lines for the eyebrows just above the eye line. The eyebrow on the right is more “S” shaped, while the eyebrow on the left is a little closer to the center line. Moving down to the chin portion of the face, let’s add the “S” shaped squiggle line for the chin dimple. You’ll notice that it’s squiggly on the left and smooths out on the right. Before we finish this step, we need to draw the two lines curving down and out from the side of the head at just about where the jaw line meets the head on either side for the neck.

Step 4
Step 04: Time for the step everyone has been waiting for, Whitebeard’s stache. As you can see in the image above, Whitebeard’s stache is a huge crescent shape across most of the middle of his face. Using the top of the notches we drew in the eye line in the previous step as the upper tips of the mustache, we’ll draw the crescent for the stache. Moving up a little, we can draw his eyes. They are narrow slits just on the eye line titled at a slight angle upwards towards the center line. Finally, we’ll draw his bandana which is another, though smaller, crescent shape on the top of the head. Start with the bottom line of the bandana. As you can see, the bandana starts on the left outside of the head and just below the eye line. It curves up to touch the top of the head and is shorter on the right. The upper line of the bandana is shorter. Once you’ve got that, we’ll move on.

Step 5
Step 05: More facial features and some hair in this step, though fortunately Whitebeard’s hair is pretty simple. We’ll go from left to right here, starting with the ear on the left. We just need to draw a “C” shape on the head starting where the upper line of the mustache touches the head on the left and stops at about the jaw line. Then, above the ear, we’ll draw the squiggle line from the bandana to the ear for hair. Below the mustache on the left side of the head we’ll add the soft “W” shape for the bandana knot. Now to the center. Starting at the top, we can add the three squiggly wrinkle line on the forehead above the eyebrows, the top one being the shortest. Next, we’ll draw the nose made up of two parts, the “S” shape to the right of the center line that starts near the right eyebrow and stops at the mustache, and the smaller curved line and dash for the nostril to the left of the center line. Once you’ve done Whitebeard’s nose, we’ll move just below the stache and draw the mouth which is mostly hidden behind the stache. To the left of the mouth there’s a short wrinkle line to draw. On the right, we’ll draw a slightly thinner “C” shape for the ear in about the same place as on the left. And, lastly, we’ll add the squiggle line from the bandana to the ear for his hair. Whew … quite a step!

Step 6
Step 06: In the next two steps you might want to follow the images as closely as you can. There’s no absolutely correct way to do these steps so feel free to try out your own ideas if you’d like. The point in these steps is to add some wrinkle and shading lines to suggest not only age but also depth to the image as Whitebeard is looking pretty flat at the moment. I’ll indicate the spots I’ve done to guide you. Important points here not to forget are: the four lines in the mouth for his teeth, dots in the eyes for pupils and the inside of the upper ear on the left. Otherwise, I’ve added lots of wrinkle lines around the eyes, some short lines to the left temple, just a couple of dashes in the hair on the left. Then, below the mouth I’ve added some vertical shading lines below the line to the left of the mouth and some shading lines below the chin dimple.

Step 7
Step 07: Same as above, except here we’re adding lines to the neck area. Use the image above to guide you. It’s important not to forget the long line on either side of the neck as these outline neck muscles and are important for the image to look right.

Step 8
Step 08: That’s it for our construction lines, mangakas. Take out your eraser and lighten all of the lines we’ve made so far and then get out your pen and trace your final lines. As you trace your final lines two important places to watch out for are the mustache and bandana. The mustache should hide most of the ears and the bandana will hide the top of the head so we shouldn’t trace those things we shouldn’t see ^_^. Also, if you didn’t draw your wrinkle and shading marks in pencil first, you can just add them here in this step in pen.

Step 9
Step 09: Before finishing up, let’s use our pen and completely fill in the top of the bandana and the knot shape below the mustache on the left.

Step 10
Click here for more One Piece tutorials
Step 10: Once your ink dries, just take out your eraser and completely erase any remaining construction lines that you can see. Take a look, you’ve drawn Whitebeard from One Piece! If your goal is to become a great mangaka make sure to draw Whitebeard again from memory. Then compare the final drawing with the original and correct any mistakes you might have made. Try once again from memory. This is the best way to build a huge library of shapes that you can use in the future for your own manga characters.
Draw with passion! -_^
Hiroshi


1 comment
i loved it and i think i did well when i drew it.
sry to hear that you have been sick, i hope that you are feeling better.
Keep up the good work, hope to see more One Piece tutorials in the future as good as this!
if you have the time i would love a tutorial of Monkey D Dragon
have a good evning.
and thanks again.
// Alathiir
Comments are closed.