Hey Mangakas! ^_^ We’ve got a great requested tutorial today. This one is for you, Hudoke San ^_-. Gene Starwind is our drawing tutorial today on How to Draw Manga in 3D. We’ll only be drawing the head this time, but I enjoyed drawing Gene so much that I will do a full body tutorial sometime in the future. The only problem is that Gene is quite detailed so it will be either really long or meant for advanced mangakas as there will be much more to do in each step.
Gene Starwind is from the Outlaw Star manga, for those who aren’t familiar. Rising from a small time jack-of-all-trades in an intergalactic backwater, Gene, along with his friend Jim, come into possession of a prototype space ship that will allow them, hopefully, to find the Galactic Leyline — something rumored to have huge treasure and power. Our tutorial is pretty straightforward today. But at the end we’ll being doing some shading to Gene’s hair. Let’s get our materials ready and learn how to draw Gene Starwind.
Step 1
Step 01: All of the blue lines you see in the tutorial are only construction lines and will be erased later on, so don’t press too hard on your pencil. Our final lines will be in black towards the end of this tutorial.
Let’s start with our head circle and center line.In the center of our paper we’ll draw a fairly large circle. As it can be hard to draw a circle free hand it might be a good idea to go around very lightly a few times with your pencil to get a circle outline and then draw your head circle on top. After you’ve got your head circle, we’ll draw a curving center line that extends well below the head circle and just slightly above it. Notice that the center line isn’t in the center but starts on the left side of the head circle at the top. This is because of the way Gene’s head is turned, we’ll be able to see it better in the following steps.

Step 2
Step 02: Here, we’ll draw the eye line and outline of Gene’s jaw. Let’s start with the eye line, which curves down slighly before touching the center line about a quarter of the way up and then levels off. Next, it’s time for the jaw. The distance from the chin to the head circle is about half of the center line inside the circle. Starting on the left where the eye line meets the head circle we’ll draw a soft curving “s” shape down to the bottom of the center line where it will form a rounded chin. Starting from the bottom of the head circle on the right and running down to the chin, we’ll draw the jaw line on the right. If you’re chin is a little too flat or too pointy, you can round it out here.

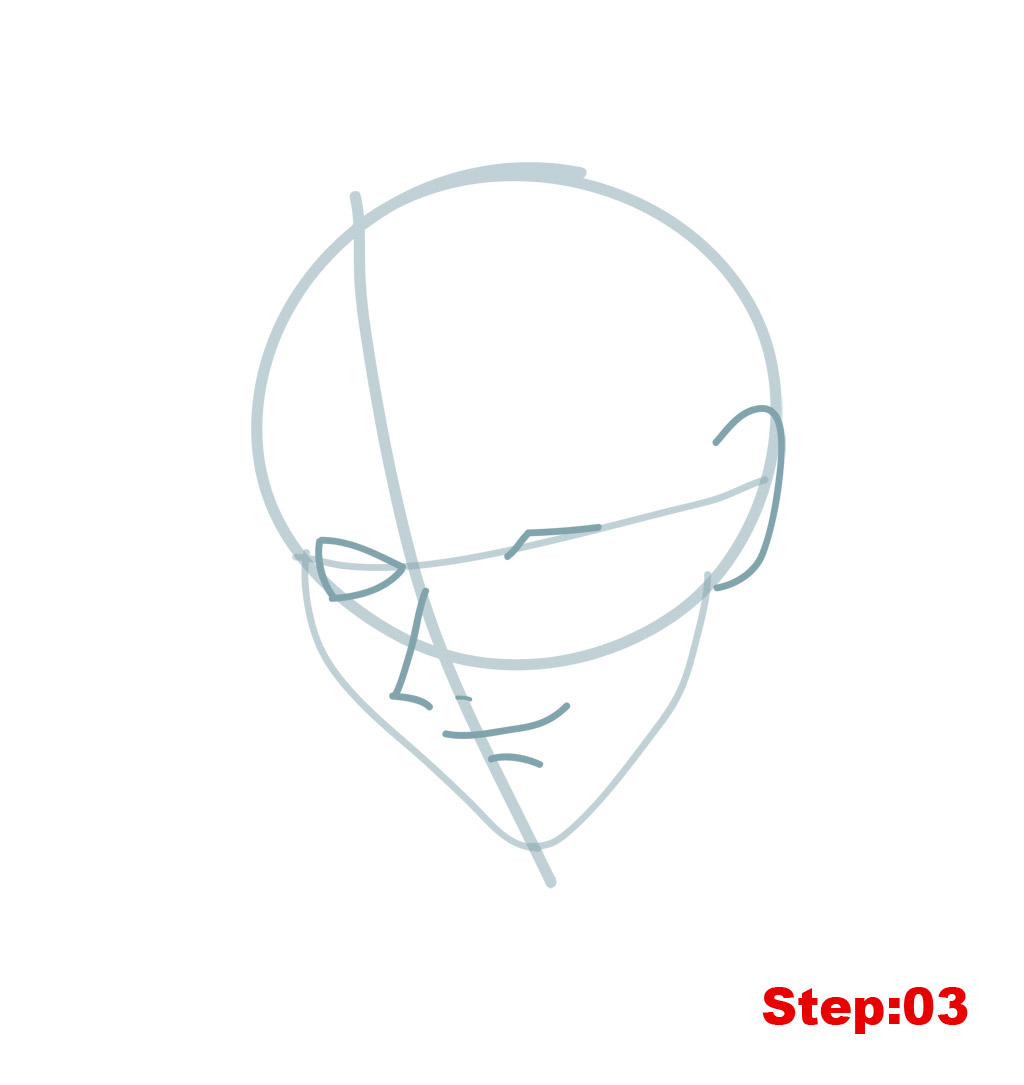
Step 3
Step 03: Time to add some facial features. Let’s start with the eyes on the eye line. The eye on the left is shaped like a guitar pick with the point closest to the center line. We’ve chosen a pose where Gene is winking at us with his eye on the right, so for that eye we only have to draw a “^” like shape just on the eye line. Then, we’ll draw the “C” shape on the right of the head for Gene’s ear. It should start in the head circle and curve around to where the jaw and head circles meet on the right . The nose starts on the center line between the eye line and head circle and is a sharp hook shape. We’ll add a small dash on the center line for his nostril. Then, beneath that also on the center line we’ll draw a line that curves up on the right for his mouth. Also, the line should be much longer on the right than on the left of the center line due to our 3D size principle. Finally, before moving on we’ll add a shorter line curving downward and just to the right of the center line below the mouth.
Step 4
Step 04: Great job, so far everyone. In this step we’ll add his neck. Let’s start with the two straight lines coming down from the jaw/head to form the neck. The neck line on the left starts at the chin and is really just an extension of the center line but curves to the left at the bottom. On the right, the neck line starts just at the bottom/back of the ear. After you’ve got those two lines, we’ll add the slightly curving lines for Gene’s other neck muscles that stop at the straight neck lines. On the right the muscle line overlaps the neck line but on the left the muscle line stops at the neck line. Lastly, we’ve got one more line to add to the neck to finish off the muscles.

Step 5
Step 05: Let’s jump into the hair! We’ll break Gene’s hair into two separate pieces, the sides/top outline and the bangs outline. We’ll start with the sides/top outline. Gene has two large hair spikes on either side of the head and three small ‘peaks’ on the top. Start on the left, on the head circle just above the eye line. Draw the two spikes away from his head and then up to the top. There’s no perfect way to draw the top of Gene’s hair, just do your best and don’t make it flat. Then, continue to the right side and finish it off with two more spikes. You’ll notice that one line for the last spike is the same line as the neck line on the right. Now, to do the bang outline. We’ll begin with the largest hair spike on the center line which should just overlap the top of the nose. When you’ve got that, it should be pretty easy to add spikes all the way to the ear on the right, and one hair spike to the left of the center line to connect up with the spikes we drew earlier. Altogether, including the large center spike, I’ve drawn six hair spikes across the forehead.

Step 6
Step 06: We’re going to continue working on Gene’s hair in this step. We’ll add a few more hair spikes to the bottom left of the head, I’ve added five in total. There’s also an extra hair spike, though small, just below the ear on the right. The lines and extra spikes you see in the image above in the main body of the hair are mostly an outline of the area that we will shade in the last step of the tutorial. If you don’t plan on shading in the hair then you don’t have to add these lines, but you can add a few extra hair spikes on the sides to give more layers to his hair. Before moving on, let’s add the three small lines inside the ear for his inner ear and the small circle on the bottom of the ear for his earring.

Step 7
Step 07: Let’s move in to the face and work on some details there. It might be a good idea to use your eraser to lighten all of the lines we’ve made so far. Let’s start with the eye on the left. We’ll draw a “(” inside the eye and then add a “U” shape for the pupil in the top of the eye. Above the eye on the left, add a small check mark for his eyebrow. For his eyebrow on the right, we’re going to draw the area that will be shaded in the final step. Start with a diagonal line and then add the irregularly shaped line over the eye. Once you’ve got that let’s draw the two lightening bolt shapes under the eye on the right for Gene’s signature battle scars. The top one can overlap some of the hair spikes. Before moving on, we’ll add two lines to his neck.

Step 8
Step 08: Great work so far mangakas! That does it for our construction lines. So, we’ll use our eraser to lighten all of the lines we’ve made so far, and then take out our finishing pen and trace our final lines. As you trace your final lines there are a few things to keep in mind. Anything that is hidden behind something else won’t be seen and so won’t be traced. An example is the eyebrow on the right. Part of the top of it can be hidden behind one of the hair spikes so we should trace the spike but not the top of the eyebrow area. Another important area is the eye on the left. You’ll notice that neither side of the eye is complete, nor is the “U” shape completely traced inside the eye.

Step 9
Step 09: In this step, we’ll work on line quality and shading. Even if you decide not to do the hair and eyebrow shading you might still want to work on line quality to improve the 3D feel of your drawing. Starting with line quality, here are the areas I’ve thickened: the nose, the chin and jaw on the left, the bottom rim of the eye on the left, and the winking line on the right. I’ve also thickened the lines of all the hair spikes and the neck. Then, I turned to shading. I filled in the area between the top part of the eye and the line we drew for the top of the eyebrow on the left and I filled in the irregular shape over the eye on the right. Then, following the lines I added to the hair in step 06, I shaded in the top part of Gene’s hair and a part of a few of the bottom hair spikes.

Step 10
Step 10: That’s it mangakas! Just completely erase any remaining construction lines you can see and take a look at Gene Starwind from Outlaw Star! I hope you like the tutorial Hudoke San! If your goal is to become a great mangaka make sure to draw Gene again from memory. Then compare the final drawing with the original and correct any mistakes you might have made. Try once again from memory. This is the best way to build a huge library of shapes that you can use in the future for your own manga characters.
Draw with passion! -_^
Hiroshi