

Click here for more One Piece tutorials
Welcome back everyone! Requested by Amy our drawing tutorial today is on Portgas D. Rogue from One Piece. I hope she likes it.
Step 1
title=”Troubled” src=”/sites/all/libraries/tinymce/jscripts/tiny_mce/plugins/emotions/img/smiley_troubled.gif” alt=”Troubled” border=”0″ /> Rogue is the mother of that other famous Portgas, Ace D., in the One Piece manga. She only appears in the manga once in a single frame holding Ace, so I had to use a better image of her from the anime. Rogue shouldn’t be too hard, although the hair can be a little trying. We’ll also be doing some shading towards the end of today’s tutorial so in addition to your pencil, pen and eraser you might want to have a grey marker handy, though you can always just use your pencil too ^_^ We’ve got lots of One Piece tutorials, so if you’re interested in learning how to draw other One Piece characters just click on the One Piece tag in the tag cloud on the right. Let’s get ready and learn how to draw Portgas D. Rogue!

Step 2
title=”Happy” src=”/sites/all/libraries/tinymce/jscripts/tiny_mce/plugins/emotions/img/smiley_happy.gif” alt=”Happy” border=”0″ />

Step 3
Step 01: As all of our returning Mangakas will already know, all of the lines you see in blue in this tutorial are only construction lines which we’ll be tracing over and erasing in later steps. So, it’s important not to press too hard on your pencil when drawing these lines. Our final, permanent lines you’ll see in black towards the end of the tutorial.
We’ll begin with our head circle and our center and eye lines. Draw a fairly large circle in the upper-center of your paper for the head shape. It’s difficult to draw a circle free hand so you might want to go around very lightly with your pencil a few times to get an outline of a circle and then draw your head circle on top of the outline. The center line is vertical and cuts the head circle in half. It extends both above and below the head circle with the lower part longer than the upper. The eye line is horizontal and rather low, about a third of the way up the head circle.

Step 4
Step 02: Great, let’s add the jaw, nose and mouth here. We’ll draw a slightly curving line from the point just above where the eye line meets the head circle on the left down to the bottom of the center line. On the right, start and finish in the same place but you’ll notice the line has a sharper curve in it than the one on the left. Next we can add the line for Rogue’s mouth. And then, we’ll draw the nose outline. It should start just above the eye line and the bottom of the nose will be just under the head circle. The bottom of the nose forms a “v” shape and is pretty sharp.

Step 5
Step 03: Now it’s time for the eyes and the first part of Rogue’s hair. The eyes are irregularly shaped, but if you’ve ever played Zelda they look like the jewels that Link has to pick up all the time ^_^. Both eyes should be drawn on the eye line, but the eye on the right is tipped upward slightly in the center. Once you’ve got the eyes done, draw the sharp diagonal over each eye for the eyebrow. You’ll notice that the eyebrow on the right has a slight hook on the end closest to the eye. Lastly, we’ll draw the outline for Rogue’s bangs. In the end it should like an “M” made from spaghetti. Start on the center line towards the top of the head and draw the first curving arch to the right. It should overlap the corner of the eyebrow and just touch the corner of the eye before ending on the jaw line. For the left side, start back up on the center line and this time our curving arch will form a flame shape at the bottom that comes to a point for a lock of hair.

Step 6
Step 04: Great work so far, mangakas! Let’s continue with the outline of her neck and the remaining major hair outline. Let’s begin with the neck. We’ll draw a line on either side of the jaw down and curving out all the way to make her neck and shoulder outline. When you’ve got that, let’s move back up the very top of the center line (above the head circle) and there are 3 major hair pieces to draw. Starting from the center line and going to the right, we should draw one long and continuous curving line all the way down to her shoulder. On the left, start at the top of the center line again and we’ll draw a large “C” line that stops on the jaw just where we drew the flame shape. Then, we’ll draw a wavy line from the hair shape down to her shoulder on the left. It seems her hair is blowing in the wind slightly, so I’ve added the curving line on the right side of the hair to suggest a piece of hair caught in the wind. You can do the same if you’d like or omit it, it’s up to you — you’re the artist ^_-.

Step 7
Step 05: In the next few steps we’re going to be working on some face and eye details, and, as always, on Rogue’s hair. So keep your eraser handy in case you’d like to redo anything. Let’s start with the eyes. We’ll draw two “( )” shapes inside each eye for the iris. Next, we’ll add the line over each eye that touches the eyebrow to form her upper eye lid. And then, let’s add some eye lashes, there are two of them on the left corner of each eye. Add the small dash under her mouth. Then, we’ll do the hair. We have to draw three curving flame like shapes for locks of hair. The lock in the center of her forehead is the most curvy. We can start with that one. It starts on the arch to the left of the center line and the point should be fairly close if not on the center line in the middle of Rogue’s forehead. Then, on the left we’ll draw another flame shape starting on the jaw line with the point being about in the middle of her cheek on the left. Lastly, we’ll draw another flame shape on the upper right of her hair starting inside the head circle. Before moving on be sure to connect this last hair piece with a line that touches our original “M” shape. This will give us another hair piece for free ^_^.

Step 8
Step 06: This step might look a little daunting at first, but we’ll break it up so it’s pretty easy. Let’s start with the flower on the upper right of her head. Pick a point just outside the hair shape for the center. Then we’ll draw five petals around this point. The edges of the petals should overlap each other slightly. Once you’ve got the flower, we’ll add the flame shape hair piece that starts from the bottom of the “M” on the right and, after coming to a point, curves back up to the middle of the head circle — the line should overlap the bottom flower petal we just drew. Next, draw the four dashes above and below the “M” shape for the roots of her hair. Next, we’ll draw the two curling hair pieces on the left at about eye level. Once you’ve got that, you can add the long and short lines throughout the bottom and sides of her hair on the left and right. This will suggest layers to her hair. I’ve added one more hair curl on the bottom left, but it’s up to you if you want to include it.

Step 9
Step 07: Let’s zoom in on the eyes for a moment and finish them off. We’ll draw a half circle inside the “( )” shapes in both eyes. Inside the half circle in the upper left corner we’ll draw a tiny circle for a reflection spot. Next, let’s move down to her torso and draw the shoulder straps to Rogue’s shirt. Just two straight lines very slightly separated on either shoulder should do the trick. Moving on, add the slightly curving lines in the space between the shoulder straps for her collar bone. Now, let’s move up and draw the inside of the flower. It has a highly irregular shape and there’s no perfect way to draw it, so give it a shot and see what you can do. Add the three small lines with the balls on top for the stamens. You’ll notice some strange lines around the eyes, just below the “M” shape of the bangs, around the nose and on Rogue’s neck. I’ve also added lines to the hair, two on the right and two on the left. These lines will help us to demarcate the area for shading in the last step. If you don’t plan on doing any shading then you don’t need them. But if you do, make sure to keep the lines around the eyes nice and sharp.

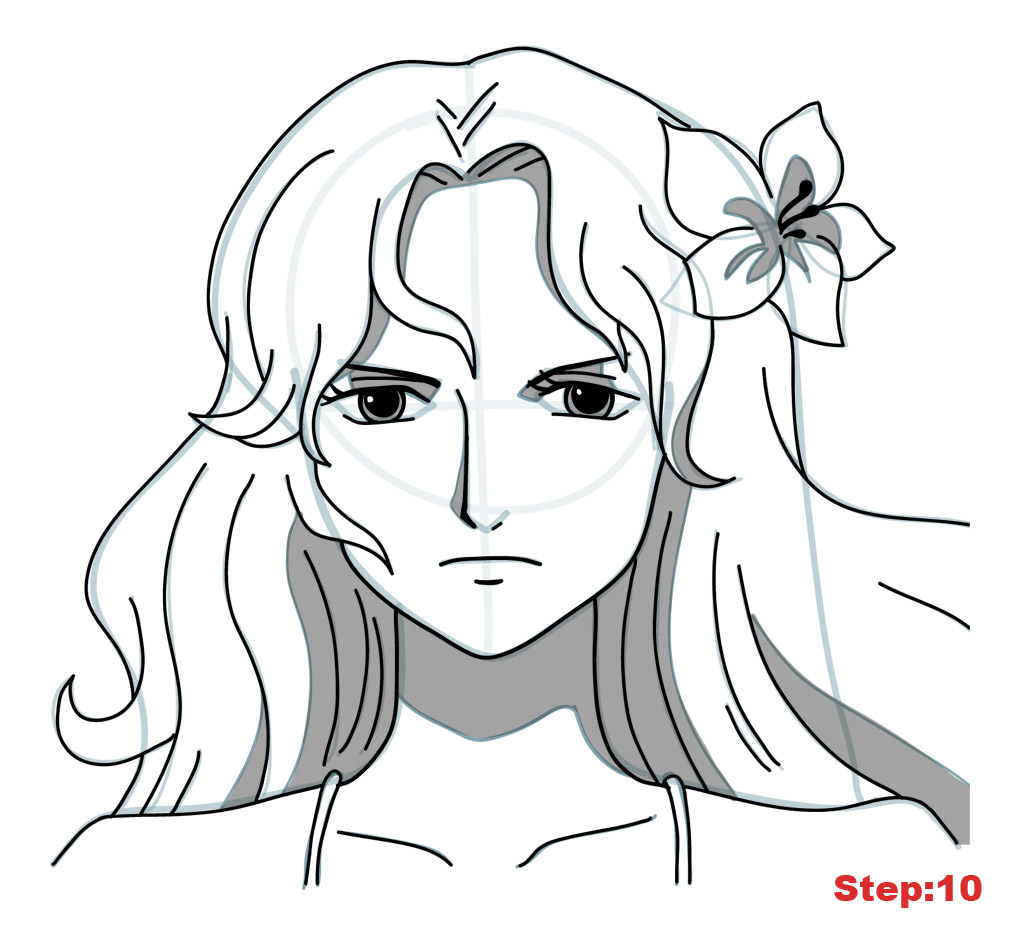
Step 10
Step 08: Ok, everyone, that does it for our construction lines. Take out your kneedable eraser and lighten all of the construction lines we’ve made so far. Then, using your pen, trace out your final lines. Make sure not to trace any of the lines around the eyes and the M shape and the neck as well as inside the flower that are only there to show us where to do shading in the last step. Two more important places to keep in mind as you trace. First, the eyes. You can see that the corners aren’t drawn in. Also, the flower. The edge of one of the petals is actually hidden beneath a lock of her hair so we shouldn’t trace that end as it should be hidden. Once you’ve got your final lines in place we’ll do some filling in the next step and some shading in the last one.
Step 11
Step 09: Using you’re pen, we’ll do some filling in this step. Let’s fill in the stamens in the flower in her hair. Then, we’ll fill in the half circles in the eyes leaving the tiny circle in the corner of the pupil empty. Before moving on, let’s thicken the line that makes up her upper eye. Let’s also thicken the eye lashes slightly and the eyebrows slightly. Once you’ve got that, let’s move on.


2 comments
Comments are closed.