Welcome back everyone! Today on How to Draw Manga in 3D our drawing tutorial is of Teru from Dengeki Daisy. Teru is a girl left alone when her brother, who was a master hacker and member of the DAISY hacker society, is mysteriously murdered. Tasuku, the high school janitor where she attends school, was a devoted friend to Teru’s brother and has agreed to watch over and take care of her in his absence. Although Tasuku might have something more up his sleeve, it’s up to Teru to figure it all out.
Although the major shapes and features are fairly easy to draw and we’re only going to be drawing Teru’s head and neck today, the hair and detail work in this tutorial can be a challenge. We’ll do some close-up steps in this tutorial to point out the spots to pay particular attention to. Its hard to draw nice girls, a small mistake in proportions can destroy everything. Beauty is based on exact proportions like the distance between the upper lip and nose. Notice that in our case we have no line for the upper lip, this is pretty common in manga. There is only a single line between the lips and the bottom of her lower lip.
If you’d like to learn how to draw other Dengeki Daisy characters just click on the Dengeki Daisy tag in the tag cloud on the right of the page for all of our Dengeki Daisy drawing tutorials. Let’s get our materials ready and learn how to draw Teru!
Step 1
Step 1: As all of our returning mangakas will already know all of the blue lines you see in this tutorial are only construction lines and we’ll be erasing them later on. So, it’s important not to press too hard on your pencil when drawing these lines. You’ll see our final lines in black towards the end of the tutorial. Let’s begin with our head circle in the upper center of our paper. It’s always a good idea to go around a few times drawing a very light circle shape and then once you have an outline of a circle to draw a darker final circle. Next, we’ll add our center and eye lines. The center line extends both above and below the head circle. The horizontal eye line remains inside the head circle touching the edges and is about a quarter of the way up the head.

Step 2
Step 02: Time to add some features 🙂 Let’s begin with Teru’s jaw. Draw a curving line down on each side of the head, starting from where the eye line touches the head circle, to the bottom of the center line we drew in the first step. The jaw line on the left is slightly more angular than the smoother jaw line on the right. This is because Teru’s head is turned slightly to the left making the right side of her face less visible and more sharply defined. Next, We’ll move on to Teru’s eyes. We’ll draw two horizontal ellipses with points in the corners for her eyes, one on either side of the center line. We should notice that the corners of her eyes are below the eye line with the eye line passing through only the top part of both eyes. We should also be aware that the eye on the left is closer to the edge of the head circle than the eye on the right. Once we have the eye’s we’ll add a “U” shape inside each. lastly, let’s draw two curving lines over each eye for Teru’s eyebrows.

Step 3
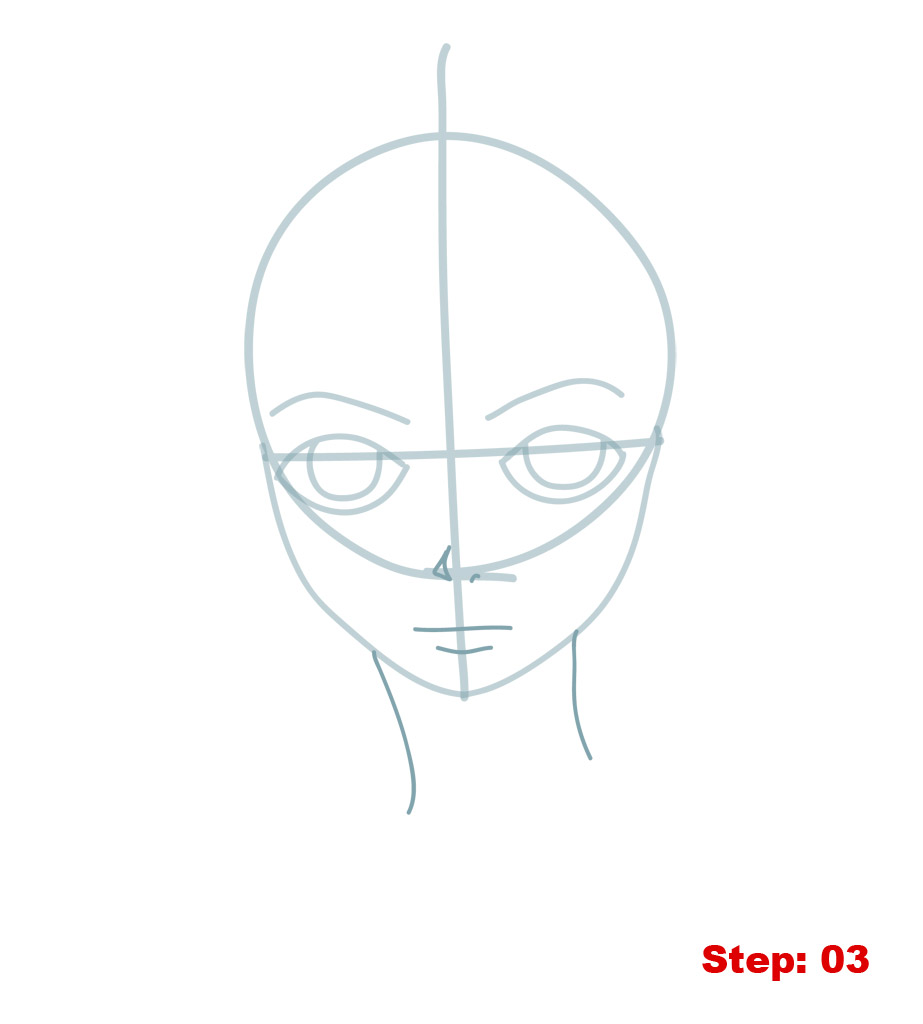
Step 03: Great work so far everyone, Time for some more details here and Teru’s neck. Let’s start by drawing the nose. Actually, we only have to draw the marks for her nostrils just on the bottom edge of the head circle. To the right of the center line, we’ve got just a small dash. While, to the left of the center line, we’ve got a curved triangle or shard of glass shape to draw. Once you’ve got it, move down a bit to about halfway between the bottom of the head circle and the bottom of the jaw/chin and we’ll draw a flat straight line for Teru’s mouth. Just beneath that, add a shorter slightly curving line for her chin dimple. Then, we’ll move further down below the head and draw the two lines that make up her neck. The line on the left is longer and curves out farther, while the one on the left is straighter and shorter.
Step 4
Step 04: Alright, mangakas, it’s time to begin working on Teru’s hair. Manga hair is always tough to draw, so don’t get discouraged if your first attempt isn’t the best. That’s why we’re drawing in pencil ^_^. Take the time to erase and repeat until you’re satisfied. And, as always, practice makes perfect. We’ll do the basic hair outline here and return to it in later steps. The outlines of Teru’s hair is neatly divided into two parts for us based on the part in her hair on the upper left. Let’s start by drawing that left piece of the hair along with the flame shape at the bottom (making 2 spikes) and stopping at her neck (on the neck line on the left).
Then, we’ll draw the second part of her hair on the right starting from the top of the hair line we just drew on the left. The hair piece on the right will have only one spike/point but is more curvy than the hair piece on the left which is more spikey. Lastly, we should draw the “V” neck to her shirt. We’ll start at the neck about half way up the line on the right, curving down, then becoming more sharp as it reaches a point (the bottom of the “V”) and then coming back up to touch her neck on the left. Notice the point of the “V” shape is quite far to the left, almost lining up with the neck line on the left. Again, this is because her body is facing in one direction while her head is turned to look out at us.

Step 5
Step 05: We’re doing great. In this step, we’re going to zoom in and do some detail work on Teru’s eyes. You might want to take a moment to lighten the construction lines around the eyes and face that we’ve made so far, this might make it easier for you to add our new lines. We’ll begin by drawing a thin “U” shape just inside the thicker “U” shape we drew in step 2. We will then add a half “U” inside the one we just drew stopping just below the eye line. Not to be gross, but it should create a small worm like shape in the bottom of Teru’s eye. This will be a reflection spot that we’ll see more clearly later on. Let’s add a second reflection spot by drawing a small circle in the upper left of each eye. After that, add the curved line over each eye for the top of her eye lid. And, lastly, we’ll draw the small dashes on her eye for her lustrous eye lashes. I’ve drawn five on the top and five on the bottom for both eyes, with the bottom lashes more evenly spread out over the bottom of the eye.

Step 6
Step 06: Well, mangakas, when the going gets tough, the tough get going. We’re moving back to work on Teru’s hair and as you can see from the image above it’s definitely tough going. I’ll try to give you a few pointers to help you out. We’re working mainly on the bangs of her hair in this step and just like the major hair outline from step 4, the bangs are divided into 2 as well. So let’s begin with the smaller part of the bangs on the left, starting with a line from just to the right of the hair part on the top of her head. The ends of the hair are rough zig zag shapes and thin little spikes, so try your best and if you’re not happy, go ahead and erase and give it another shot. For the larger part of the hair on the right, start with the hair parting line and draw your zig zag lines until you reach the edge of the head circle on the right. There’s also a hair spike that covers a part of her cheek on the right, too. There are also a few strands of random hair on the right you can draw if you’d like. And the tips of the hair on the right or left are roughed up with some more zig zags. Before moving on, it’s important to draw the very thin “C” shapes on either side of the head for her ears. Most of Teru’s ears will be hidden by her hair.

Step 7
Step 07: Another detail step here, mangakas. We need to finish the collar of Teru’s shirt. There’s a line connecting the “V” shape with her hair on the left. And starting from the bottom of the hair on the right we’ll draw a line down, and then curving a great deal one way and the other before touching the “V” shape towards the point. Once you’ve got Teru’s collar done, we’ll draw the four lines on her neck suggesting her neck muscles.

Step 8
Step 08: That does it for our construction lines. Use your eraser to lighten all of the lines we’ve made so far and then take out your pen and begin tracing your final lines. If you want to add the hair highlights like we do in Step 11, it’s important not to use pen to do your final lines but just a darker pencil. If you’re happy not having the highlights in Teru’s hair, then go ahead and use a pen to do your final lines. As you trace your final lines, it’s important not to trace anything that should be hidden from view. It’s also really important to leave a few spots empty and untraced.
Here’s a guide for you. I’ve left the corners of her eyes untraced and kept her nose really small, also although I used the parting of her hair to help me draw the hair, I don’t trace it here, and even more importantly inside the eyes I have only traced the worm shape instead of all the “U” shapes I drew in order to make it in the first place. Once you’ve got your basic outline to your satisfaction, we’ll move on to do some shading and filling. As you can see in my image above, I got a little carried away and began filling in her hair a step too soon ^_^. We’ll be doing that next.

Step 9
Step 09: Again, if you want to add the highlights to her hair but are not using a drawing software program I recommend continuing to do the filling and thickening of the lines with your pencil. Just press a little harder to get a darker or thicker line. In this step we’ll fill in Teru’s hair and her eyes except for the worm like shape and the small circle in the corner of her eye. We can also fill in the small triangle like shape we made for her nose on the left. You’ll also notice that I’ve done some work on my line quality (thickening of the lines). In particular I’ve thickened the lines on the bottom and top of her eyes along with her eyebrows. I’ve also thickened the line that makes up the bottom of her chin/jaw. This will help add depth to our image.

Step 10
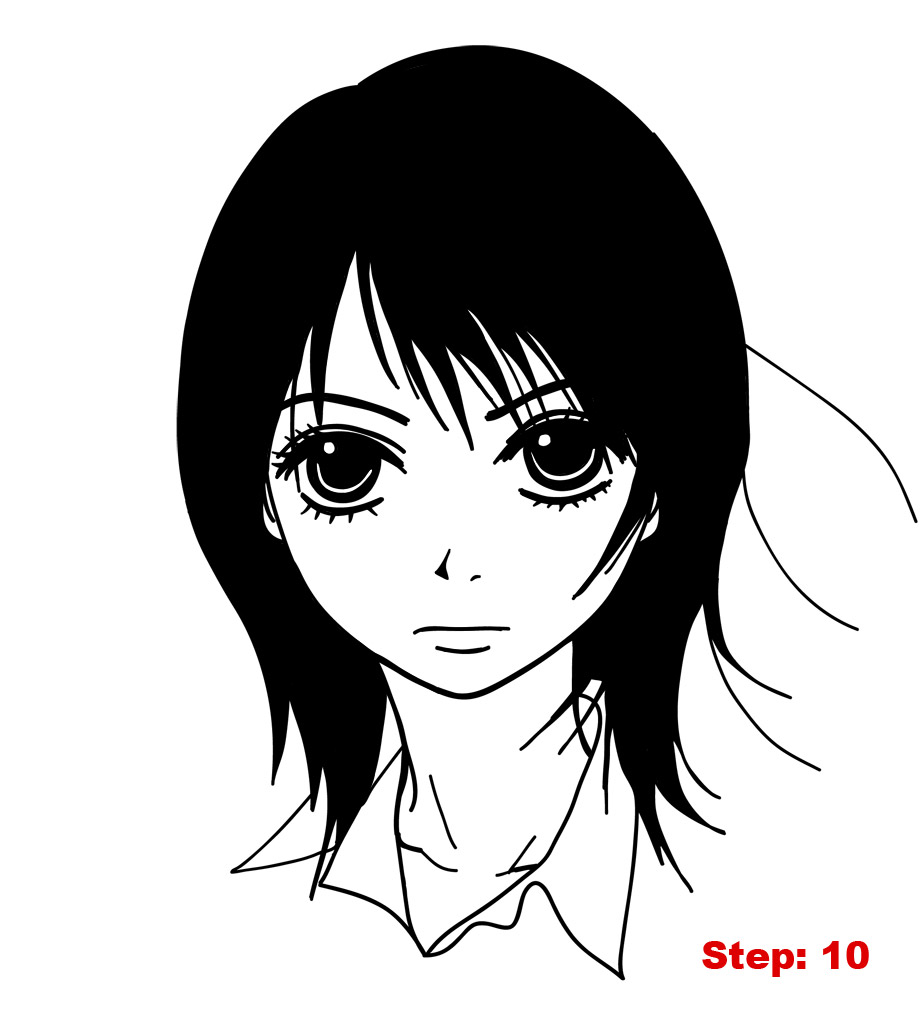
Step 10: If you’re not going to do the highlights in her hair, this is your last step. Erase any remaining construction lines and you’ve got Teru. I’ll jump ahead to finish her hair off.
Step 11
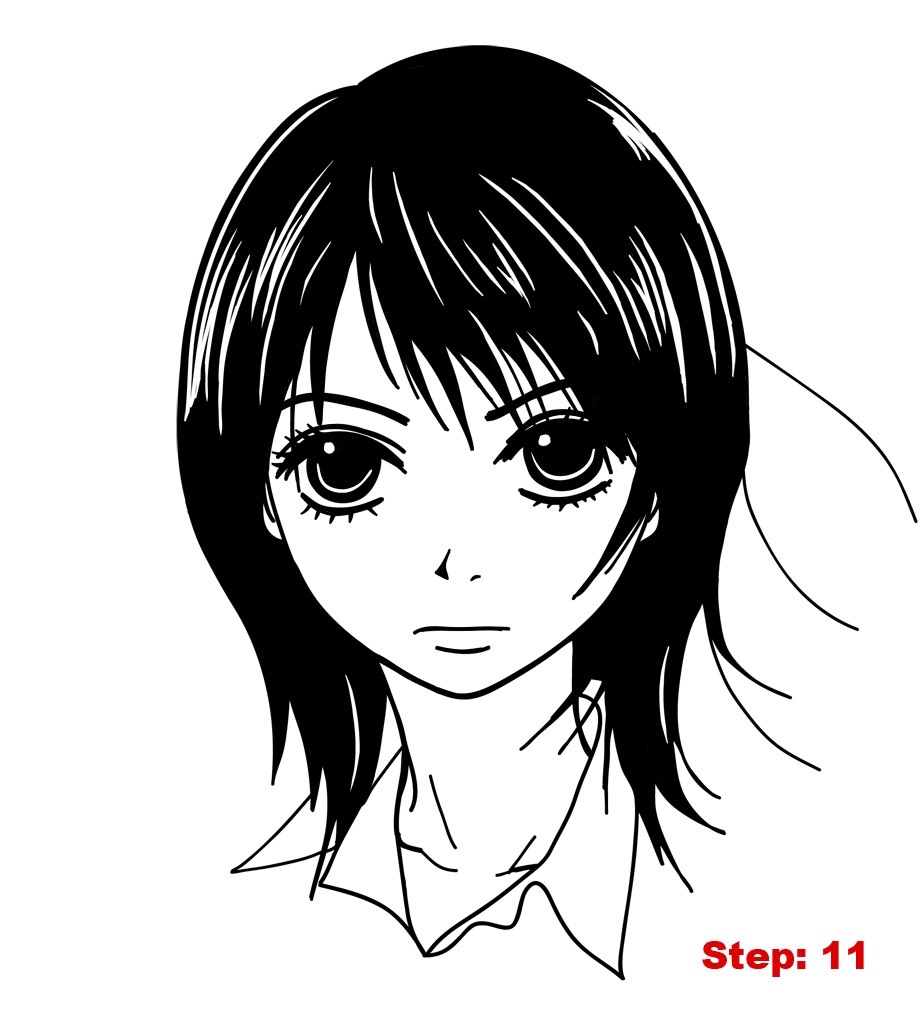
Step 11: Teru’s hair highlights are incredibely detailed here, if you are working in photoshop add another layer and paint thin white lines with sharp edges. But, if you are drawing on paper with pencil try to use a sharp eraser (the Mono Zero eraser stick is great for this) and then go over the edges of the highlights with pencil to make them harder and sharper.
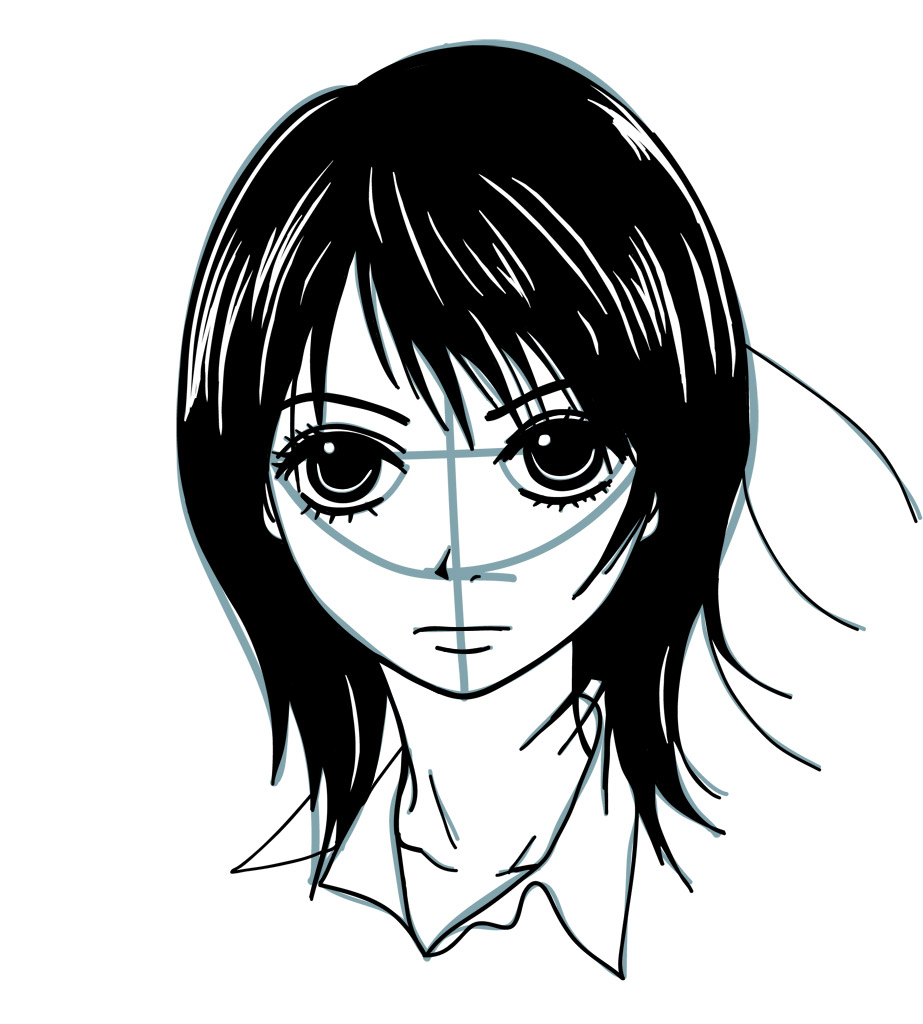
Once you’ve got the highlights done, stand back and take a look at Teru from Dengeki Daisy! If your goal is to become a great mangaka make sure to draw Teru again from memory. Then compare the final drawing with the original and correct any mistakes you might have made. Try once again from memory. This is the best way to build a huge library of shapes and get the tracing experience necessary that you can use in the future for your own manga characters.
Draw with passion! -_^
Hiroshi



1 comment
Comments are closed.