Welcome back Mangakas! Today on How to Draw Manga in 3D our drawing tutorial is on Natsu Dragneel from Fairy Tail. Natsu is the leading characters of the series. After being discovered by a Fire Dragon, Natsu was raised by the dragon and taught, in addition to the simple tasks of talking and writing, a specialized magical skill that everyone had forgotten about: his Fire Dragon Slayer Magic. With these techniques and an impressive hand to hand combat ability, Natsu has always been a serious challenge to any foe. He’s an extremely competitive character always looking for the next challenge.
We’ll be drawing just the head today so it shouldn’t be too difficult even for beginners, except perhaps for the hair which can be a little tricky. If you’re interested in learning how to draw other Fairy Tail manga characters just click on the Fairy Tail tag in the tag cloud on the right of the page to see all of our Fairy Tail manga drawing tutorials. Let’s get our pencils ready and learn how to draw Natsu!
Step 1
As all of our returning mangakas will already know all of the blue lines you see in this tutorial are only construction lines and we’ll be erasing them later on. So, it’s important not to press too hard on your pencil when drawing these lines. You’ll see our final lines in black towards the end of the tutorial. We’ll start with a fairly large circle in the middle of our paper. We should leave enough space around the edges and especially the top for Natsu’s spiky hair. As you can see in the image above it doesn’t have to be a perfect circle, in fact mine is a little taller than wide. As it can be quite difficult to draw a perfect circle I recommend going around with your pencil a few times very lightly to get an outline of a circle and then draw your actual circle on top of that. It always helps to have a guide ^_^.

Step 2
Now we’ll draw our center and eye lines to help us situate his features. Draw the vertical center line neatly dividing the head in two but as it extends down past the head circle it curves slightly to the right. The eye line is horizontal and a little higher on the right than on the left about a third of the way up the head circle.

Step 3
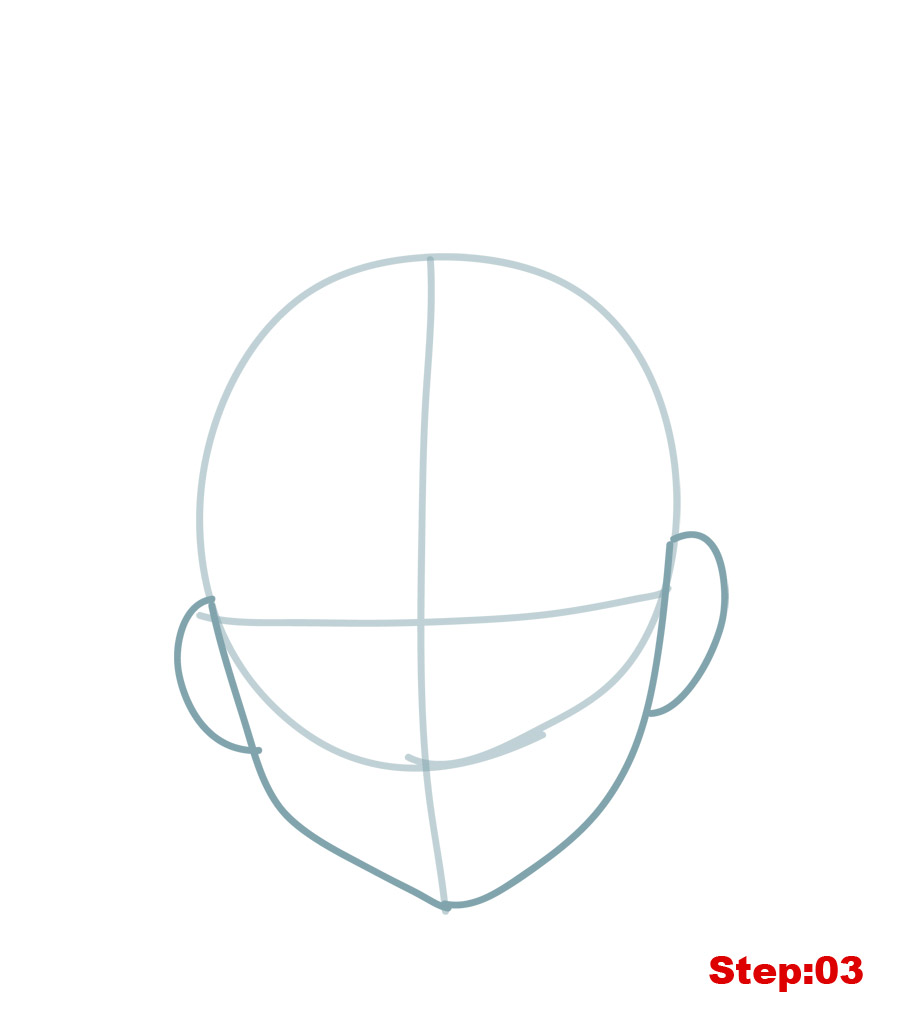
Good so far. Let’s continue by drawing the jawline and ears. We’ll draw a curved line on either side of the head starting from where the eye line touches the head circle and stopping at the bottom of the center line we drew in the previous step. You’ll notice that the line on the right curves more gradually, while the line on the left starts more vertically and curves more sharply about half way down. This is due to the fact that Natsu’s head is turned slightly to the left, the side of the jaw that is turned toward us will be smoother and vice versa. Now we’ll add two “c” shapes to either side of the head for his ears. The ear on the right is larger and more highly positioned than the one on the left.
Step 4
Now to move in and work on his facial features. To draw the eyes, we’ll draw two incomplete leaf like shapes on either side of the center line. To make his face more expressive, the eye on the right should pass just above the eye line while the eye on the left touches but never goes above the eye line. It’s also important that the outer corners of the eyes rest on the eye line and the bottom of the eye touches the bottom of the head circle. If you have trouble drawing an unfinished leaf shape then just draw a full leaf shape and erase the inner corners. Next, we’ll draw the small hook shape for his nose on the centerline, the downward curving line for his mouth, and a dash under the mouth for a chin dimple. We can note that the line for his mouth is longer on the right of the center line than on the left.

Step 5
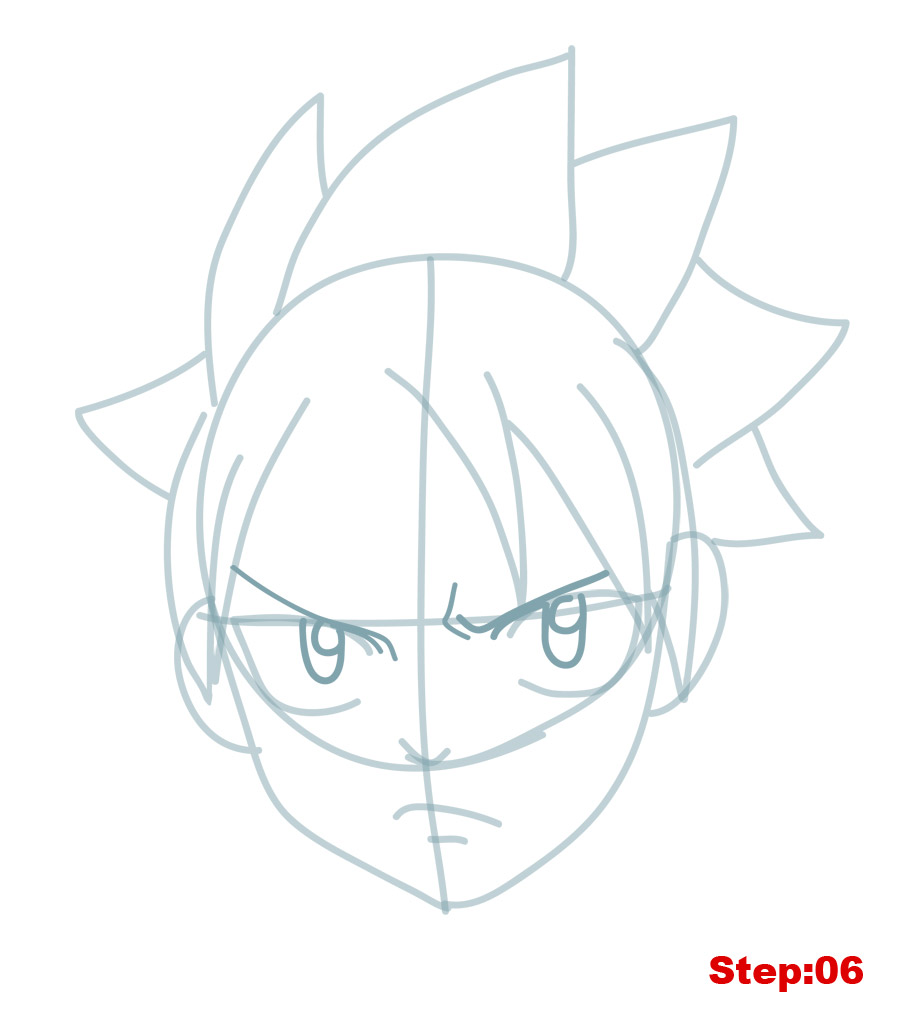
Alright, mangakas, it’s time to work on Natsu’s hair. It can be a little tricky, so don’t get discouraged if you’re not happy with your first try. Just erase and give it another shot. We’ll start with the large hair spikes at the back of the head. They generally curve to the right slightly and the largest spike is right in the middle. So let’s begin by drawing that one. Then we should add three more spikes to the right of the center and two to the left of the center spike. The spikes on the right will stop just on the ear on the right while the spikes on the left will stop well above the ear on the left. Also notice how each spike isn’t complete but starts about halfway up the previous spike. Now, we’ll turn to the thinner and longer hair spikes that cover parts of Natsu’s face. Begin with the three spikes on the right, and start with the center spike. The second spike to the right will overlap the outer corner of the eye and the longest outer spike will overlap a lot of the ear on the right. Then, draw the two on the left, noticing how the outer hair spike actually begins outside the head circle up where we finished our back hair spikes before.

Step 6
Great work, everyone! In this step we’ll work on the eye area. To begin, let’s draw a “U” shape inside each eye. Then, we’ll draw a half circle in the corner of the “U” shape. Above the eye on the right, we’ll draw a strong hook shape for his eye brow. Next to the hook in the center we’ll draw a zig zag line on the eye line. For the eye on the left we’ll also draw a sharp diagonal for his eyebrow but it’ll turn downward at the end instead of up like the one on the right. Lastly, there are two small lines below the eyebrow hooks just at the top of the eye for the top of his eye lids.
Step 7
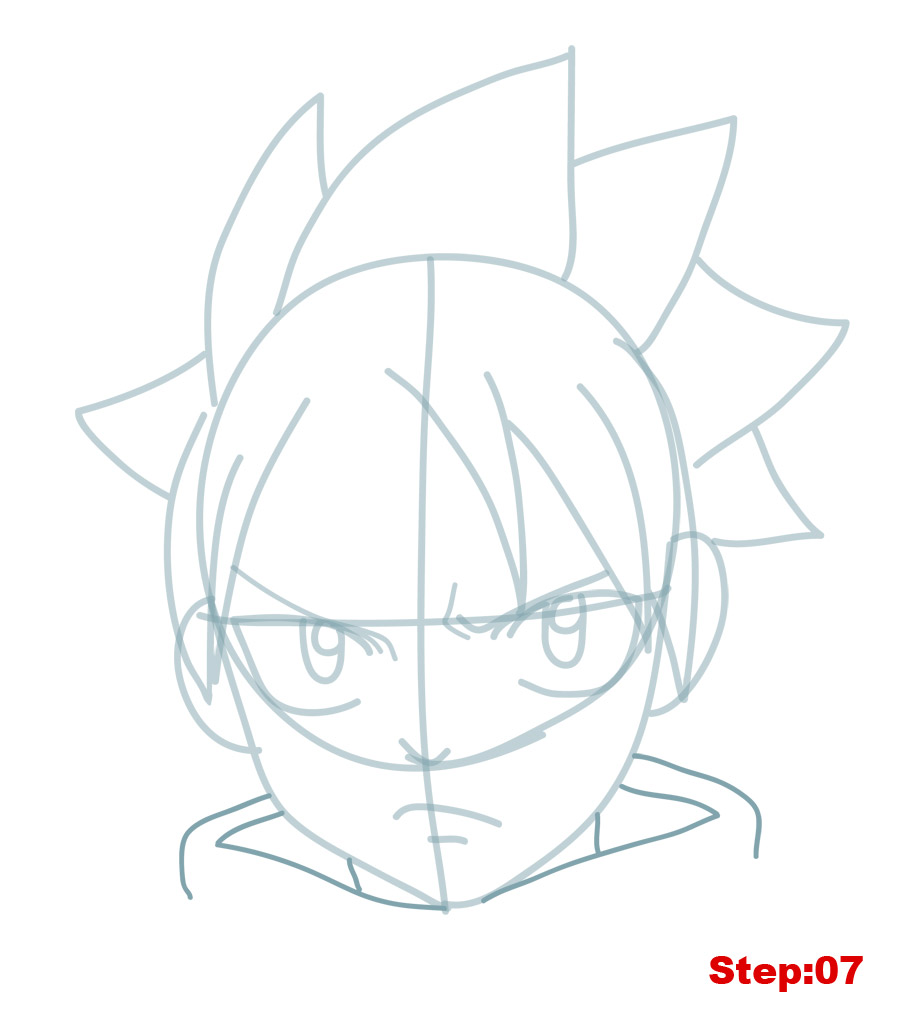
Moving down to just below the head we’ll work on his neck and scarf. Let’s begin at the chin and we’ll draw a “<" shape on the left and a ">” shape on the right. Connect the head to the these lines with two short vertical lines for the neck. Lastly, draw another line just above our “<>” shape, but it curves down as it reaches the ends of the V shape.
Step 8
A last step to finish up Natsu’s hair and scarf and we’ll be done with our construction lines. I count 17 additional hair spikes that I’ve added in this step but yours might be different. There’s no perfect way to do this step so it doesn’t have to be exactly like mine. But some general points might help. We should be drawing shark fin like shapes the whole time with all of them curving to the right slightly. We definitely need to add a few hair spikes touching the ears on the left and right. It’s also important to add the four spikes to the front-top of his head. We should also add a spike that will overlap the top of the ear on the right. As for the rest, fill in any spots you feel are empty or follow my image above. We also need to add a couple of lines to the inside of the ears to give the inner ear some shape. And before moving on, we should draw the last lines to the scarf.

Step 9
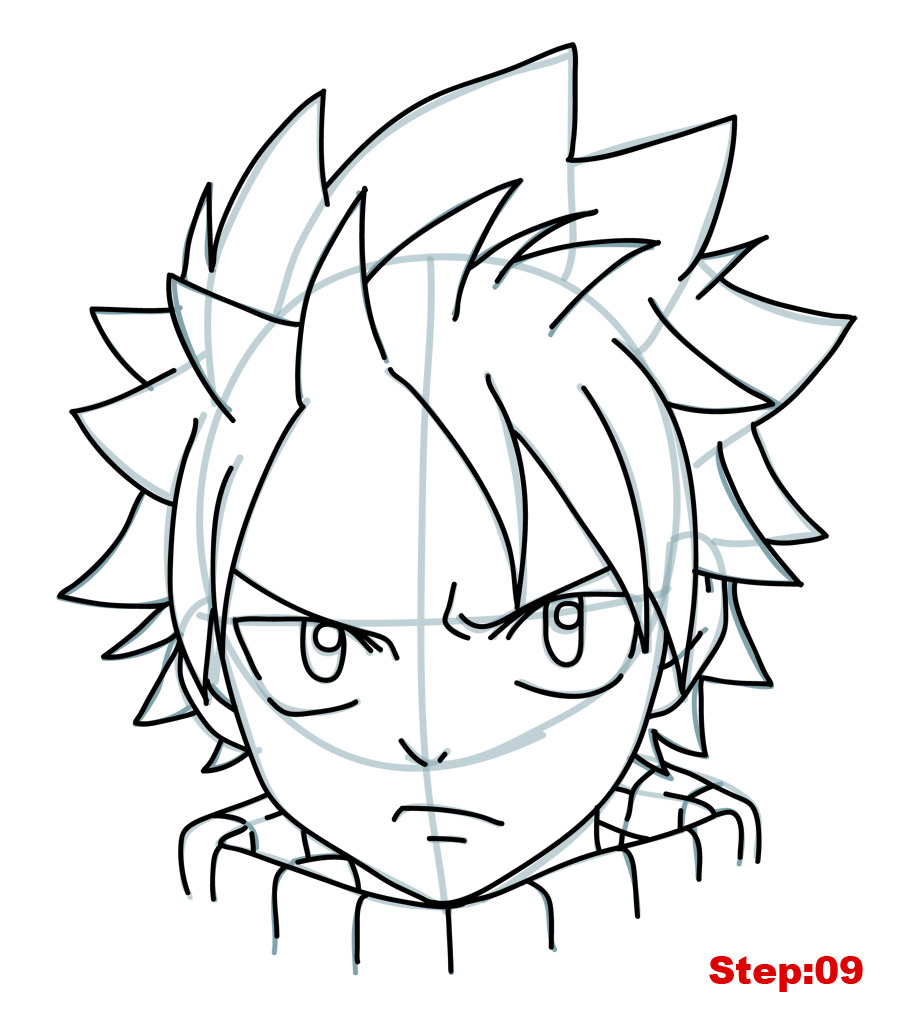
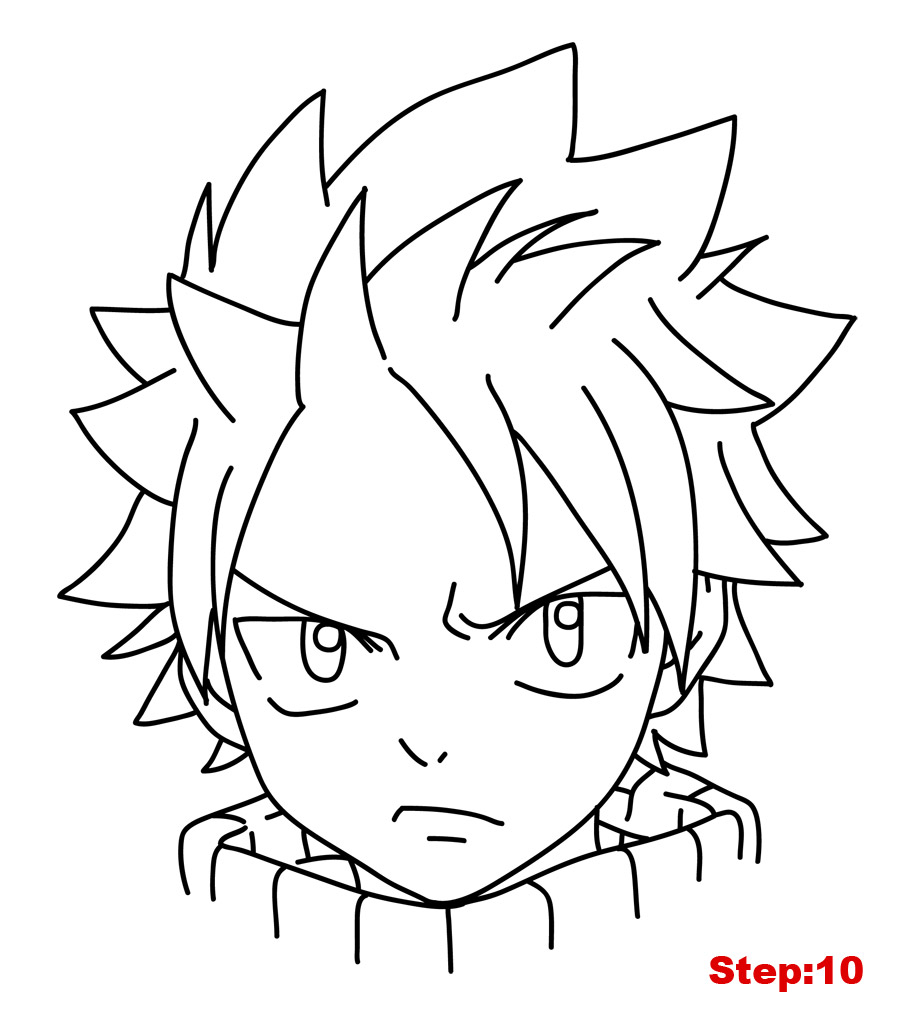
Excellent job, mangakas. Now, take out your eraser and lighten all of the lines we’ve drawn so far. We’ll use our pen to trace our final lines in this step. As you trace your final lines, you’ll notice that we don’t trace all of the construction lines but only those we want to appear. It’s especially important not to trace anything that’s overlapped by something else as it shouldn’t be visible to us We see examples of this on the hair spikes at the back and ears on both the left and the right. We should also be careful with the eyes, which are incomplete with gaps. The nose, too, isn’t a complete line but also has a gap.
Step 10
Once your ink is dry, completely erase any remaining blue lines you can still see. We could finish up here but I’d like to do one more step and work on line quality around the eyes and some shading.
Step 11
Using your pen we’ll thicken the lines of the upper eye lids slightly. We can also thicken the lower part of the eyebrows to give them some dimension. We can also improve the mouth a little bit too. Next, we’ll add a shadow to part of the neck area just below the chin and the pupils (“U” shapes) of the eyes leaving the small half circles we drew before empty as reflective spots. Once you’ve got your line quality and shading to your satisfaction, stand back and take a look at Natsu Dragneel from Fairy Tail. If your goal is to become a great mangaka make sure to draw Natsu again from memory. Then compare the final drawing with the original and correct any mistakes you might have made. Try once again from memory. This is the best way to build a huge library of shapes and get the tracing experience necessary that you can use in the future for your own manga characters.
Draw with passion! -_^
Hiroshi




27 comments
Thx Detective!
Thx for the requests guys! I think more Fairy Tail tutorials would be great. I will start with Lucy and Gray then
For some weeks i won’t be able to post because my phone broke. ) :
I drew this but I am unable to upload it. Help!!!
pls can you draw houki from infinite stratos
Comments are closed.