
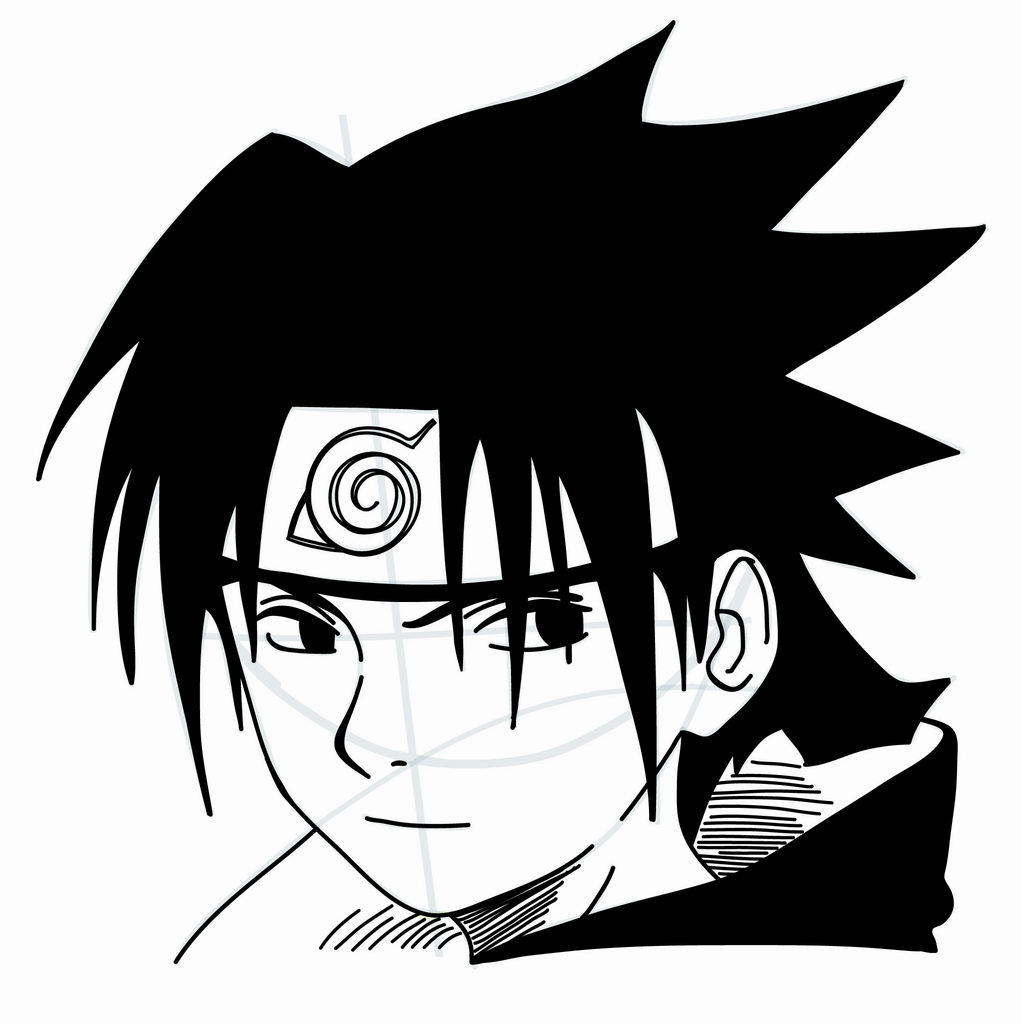
Starting this week with a great new Naruto drawing tutorial. Today we’re going to do Sasuke requested by user Dekko. Check out all of our step by step Naruto drawing tutorials here. Sasuke’s story is a good guy gone bad story. Despite starting out as one of the best good guys and an Uchiha at that, he soon turns to the dark side and becomes one of the principle antagonists of the series. Sasuke is pretty easy to draw and so this tutorial is recommended for all levels of mangaka! There is some easy and great hair practice as well as some good illustrations of our 3D drawing principles. If you’ve got a request please be sure to post it by clicking on the request tutorial button on the top of the page.
Step 1
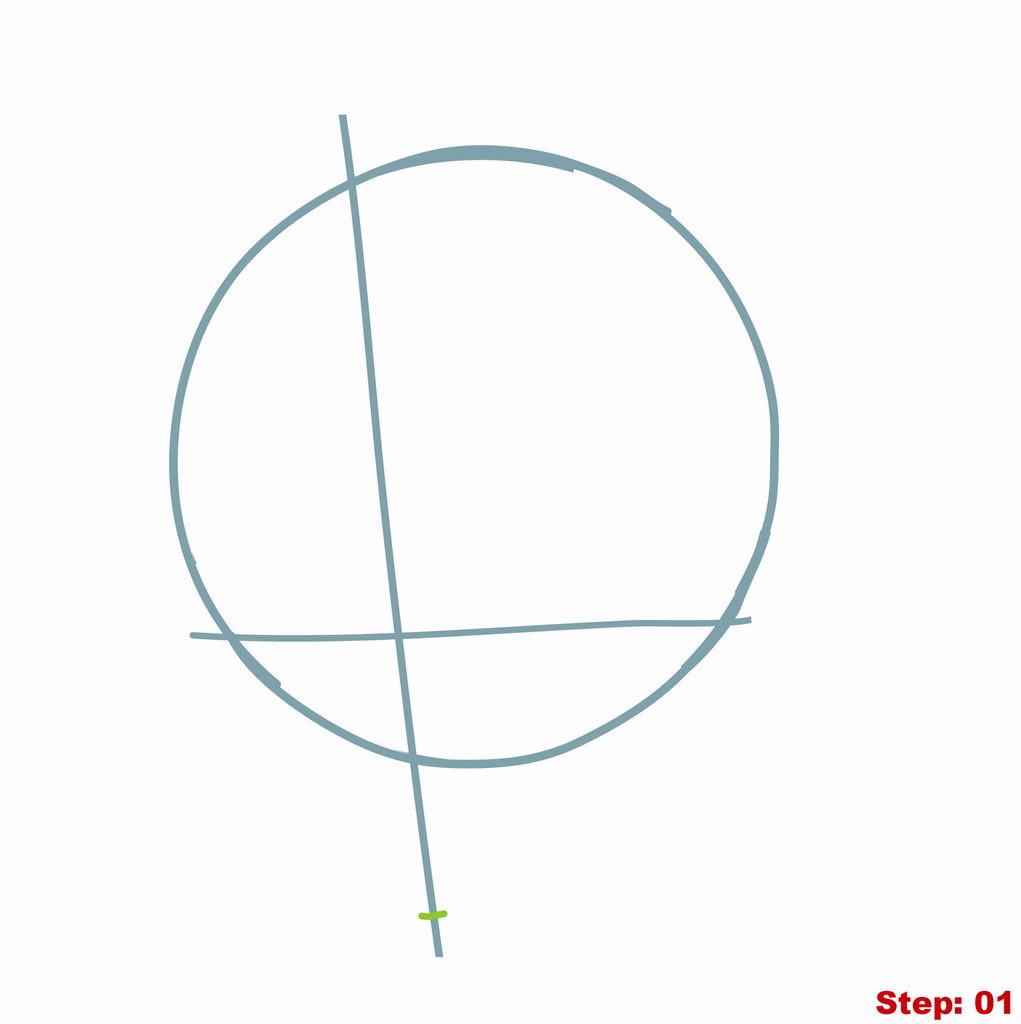
Step 01: Just a reminder to all of our mangakas that all of the blue and green lines you see in this tutorial are only construction lines and will be erased later on, so don’t press too hard on your pencil when drawing these lines. Our final lines you’ll see in black at the end of the tutorial.
We’re going to begin with our head circle, center and eye lines. Let’s start by drawing a fairly large head circle in the center of our paper. We want to be sure to leave enough room around the head circle to draw Sasuke’s spikey hair and his neck ^_^.
Pro Tip 1: When drawing your head circle go around a few times very lightly with your pencil to get a nice outline of a circle, as it can be quite hard to draw a circle free hand. Then trace your head circle over the outline you have made.
Next, we’re going to draw our center and eye lines. We have Sasuke posed turning slightly so we’ll need to shift the center line to the left of center slightly and tilt it to the left slightly.
Pro Tip 2: We want the center line to extend slightly above the head circle but quite far below it. Towards the bottom of the center line we want to add a small dash to mark the area for the chin. This will also help us to draw the jaw line in the next step. So here are some measurements to help you. The horizontal eye line should be about 1/5 of the way up the head circle. The distance between where the eye line and the center line interect and the small chin dash is equal to about twice the distance between the intersect point and the bottom of the head circle. In other words, if you’re head circle is 10cm in diameter then the eye line will be about 2cm up the head circle and the chin dash will be about 4cm from the intersection point of the center and eye lines.
Step 2
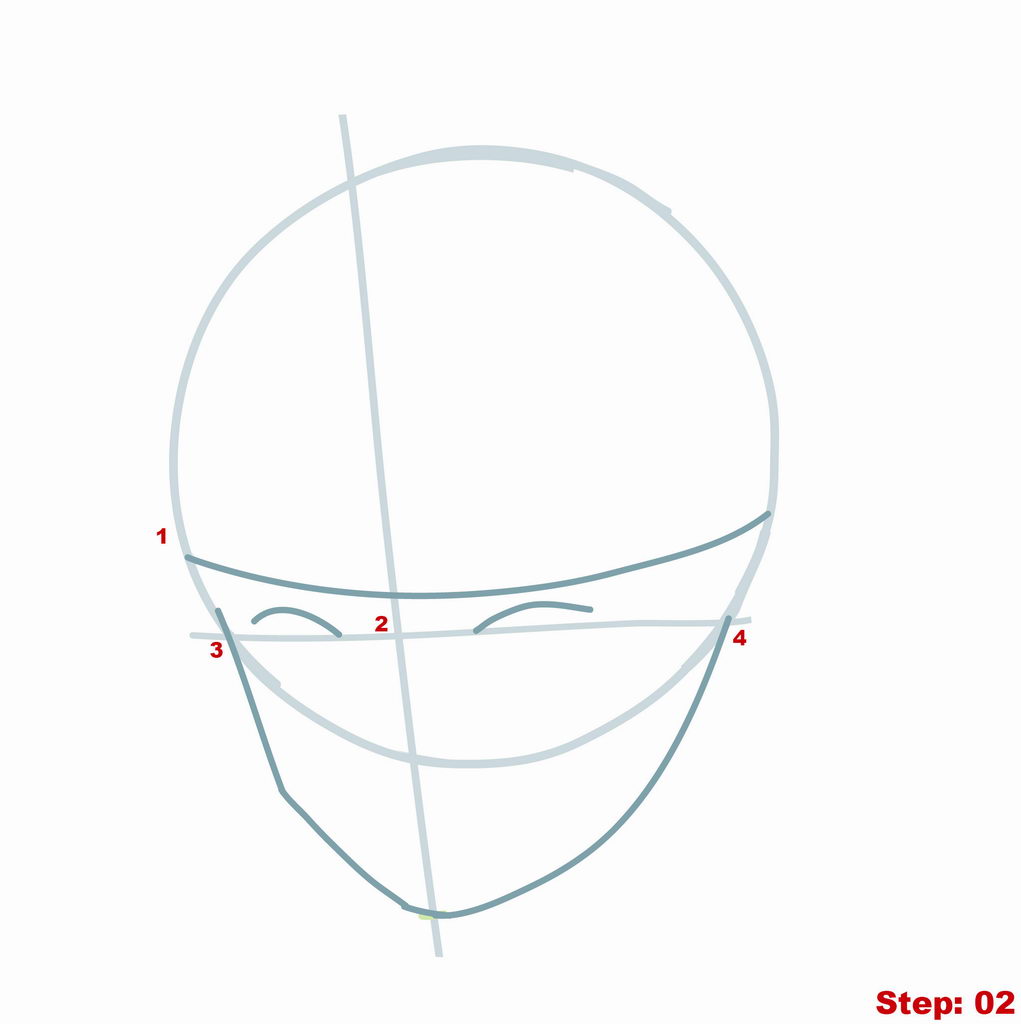
Step 02: In this and all future steps I’ve labeled the lines or areas with numbers in the order you should draw them. This makes it easier to describe the lines with numbers and you can see very clearly if you’ve forgotten anything in the step. So here, we’ll begin with the curving line that marks Sasuke’s head band (line 1) across the forehead area above the eye line. Don’t worry if it’s not perfect the first time, we can always erase and make it a little higher or lower later on.
Pro tip 1: Although it might look like it is easier to draw the eyes or the jaw first, it’s kind of a general rule to try to draw from top to bottom and left to right. That’s why we’re starting with line 1, the headband and not the eyes or jaw.
Next, we’ll draw the tops of the eyes by drawing a half circle like shape for each eye. The inner corner of the eyes should touch the eye line but the outer corners of the eyes will stop just above the eye line.
Pro tip 2 and 3D principle: The eye on the right should be a little farther from the center line than the eye on the left. It’s also very slightly bigger. The reason for this is that Sasuke has the side of his head on the right turned towards us, so that side of his head will be “closer”. To make it look right, this means that the features on the left need to be a little smaller or a little differently shaped following our 3D size and squashing principles. Check out the link for more examples.
Lastly, let’s draw the jaw which is made up of two lines (#3 and #4). Start on the left just above where the eye line meets the head circle and we’ll draw a line (#3) with a kink in it down to the chin dash we made in the previous step. On the right, our line #4 starts right where the eye line meets the head circle and goes down to the chin dash in a nice smooth curve, no point or kink in the jaw on the right. If you feel that your chin is too pointy, take a minute to round it out a bit with your pencil and then we’ll move on.
Step 3
Step 03: So we’ll take this step in order following the numbers in the image above. Beginning with area 1, the eye on the left, we’ll draw the eyebrow line curving down from the head band to cross the eye line. Then, add the line with the little upturn in the outer corner for the lower lid of the eyes.
NOTE: The eyes shouldn’t be completely closed, but there will be a gap in the outer and inner corners.
Let’s continue with area 2, the eye area on the right, where we’ll draw a shorter slightly wavy line for the eye brow closer to the center line than on the left. Below the eye line, add the line for the lower lid. Then, we’ll jump further to the right and draw the vertical line from the head band to the bottom of the head circle to mark the hair and ear space. And from that line, just below the head band, we’ll draw the large “C” shape for the ear (line #4). In area #5, we need to draw the rather flat mouth line which is a little longer on the left than on the right of the center line. And lastly, just to the right of the chin on the jaw line ad a small line for the neck. Great work so far!

Step 4
Step 04: Continuing with Sasuke’s facial features, we’ll kick off this step finishing the eye on the left by drawing a curving line between the eyebrow and the upper eye. Then we’ll add a “(” and “)” shape inside the eye to form the iris/pupil. We want the pupil to be in the right corner of the eye (closer to the center line). Moving on, we’ll draw the “s” shaped nose (line #2) starting from the bottom of the eyebrow for the eye on the left. And, we’ll add a dash for the nostril just to the left of where the center line meets the bottom of the head circle. Area #3 is the eye on the right where we need to draw the a slightly flatter line between the eyebrow and the upper eye. Then, draw the “(” and “)” lines inside the eye for the iris/pupil area. Notice that these should be in the right corner of the eye (furthest from the center line). Lastly, inside the ear on the right (line #4) we’ll draw the irregular “c” like shape. And that wraps up this step.

Step 5
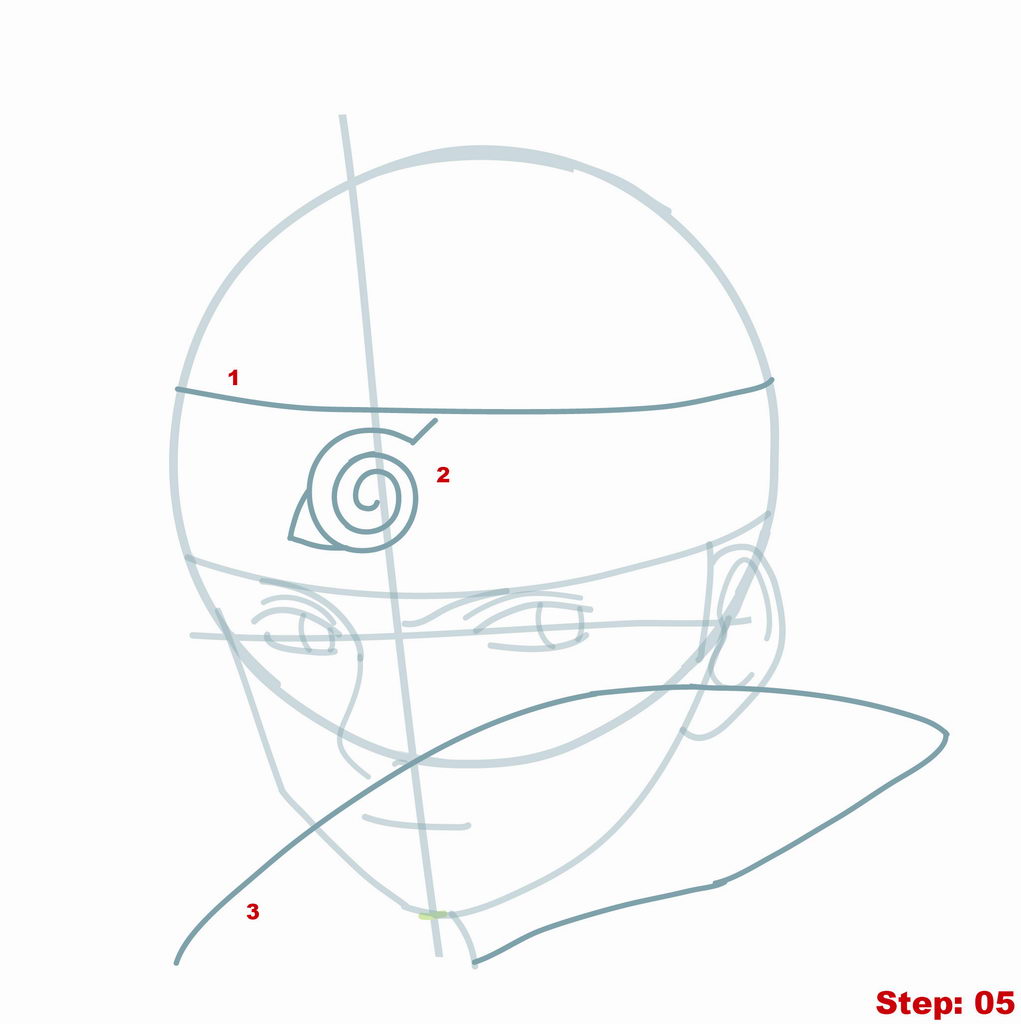
Step 05: We’ll begin here by drawing the slightly curving top of the headband line (#1). Once you’ve got that we’ll draw the leaf like Naruto symbol on the headband (#2).
Pro tip: The easiest way to draw the Naruto symbol is to begin by just drawing the spiral shape. Once you’ve got the spiral then add the small dash at the beginning of the spiral at the top-right. Then, draw the small “^” shape on the bottom-left. And that’s it! I wouldn’t recommend trying to draw it all at once as it can get messy ^_-!
Lastly, we need to draw line #3. It’s got a really irregular shape and it doesn’t really match up with any other lines. It’s for the hood of Sasuke’s jacket. Give it a shot and don’t worry if it’s not perfect, we can always make some adjustments later on.
Step 6
Step 06: As I said in the intro, Sasuke has got some great hair practice and here’s where we begin. I’ve labeled all the hair segments for you in the order to draw them. So we’ll begin at the top of the head circle with hair segment #1 that goes to the left. Next, we’ll go back to the center line and draw hair segment’s #2, #3 and #4 on the head circle to the right. These segments are triangle or shark fin shapes that get a little thinner or smaller as we progress to the right. Hair segment #5 is a longer and thinner “v” shape that starts on the head circle on the left where the top line of the headband meets the head circle. As you can see it should overlap the headband. Hair segment #6 is actually a “Z” shaped line that starts on the top line of the headband and finishes on the head circle just to the left of the ear. Lastly, we need to draw area #7 which consists of the small “C” shape inside the ear to finish that, the curving neck line that starts just at the bottom of the ear where it meets the jaw line and then the diagonal line coming off of the ear and touching the neck line for hair in the back.

Step 7
Step 07: We’ll continue with Sasuke’s hair in this step adding in some hair segments and spikes. I’ve numbered them for you in the order to draw them. So start on the left with segment #1, a fairly long and thin “v” shape. Then, up on the top of the head circle to the right of the center line, we’ll draw hair segment #2 as a triangle shape. And we’ll do the same for segment #3 just below that. Hair segment #4 is another long thin “v” shape that starts on the top line of the hair band and overlaps the eye on the right. Segment #5 is on the right side and is a short thin “v” shape that starts on the bottom line of the head band. Next, we need to draw the irregular shape for Sasuke’s hair in the back (segment #6). Give it a shot and if you’re not totally happy, erase and try again.

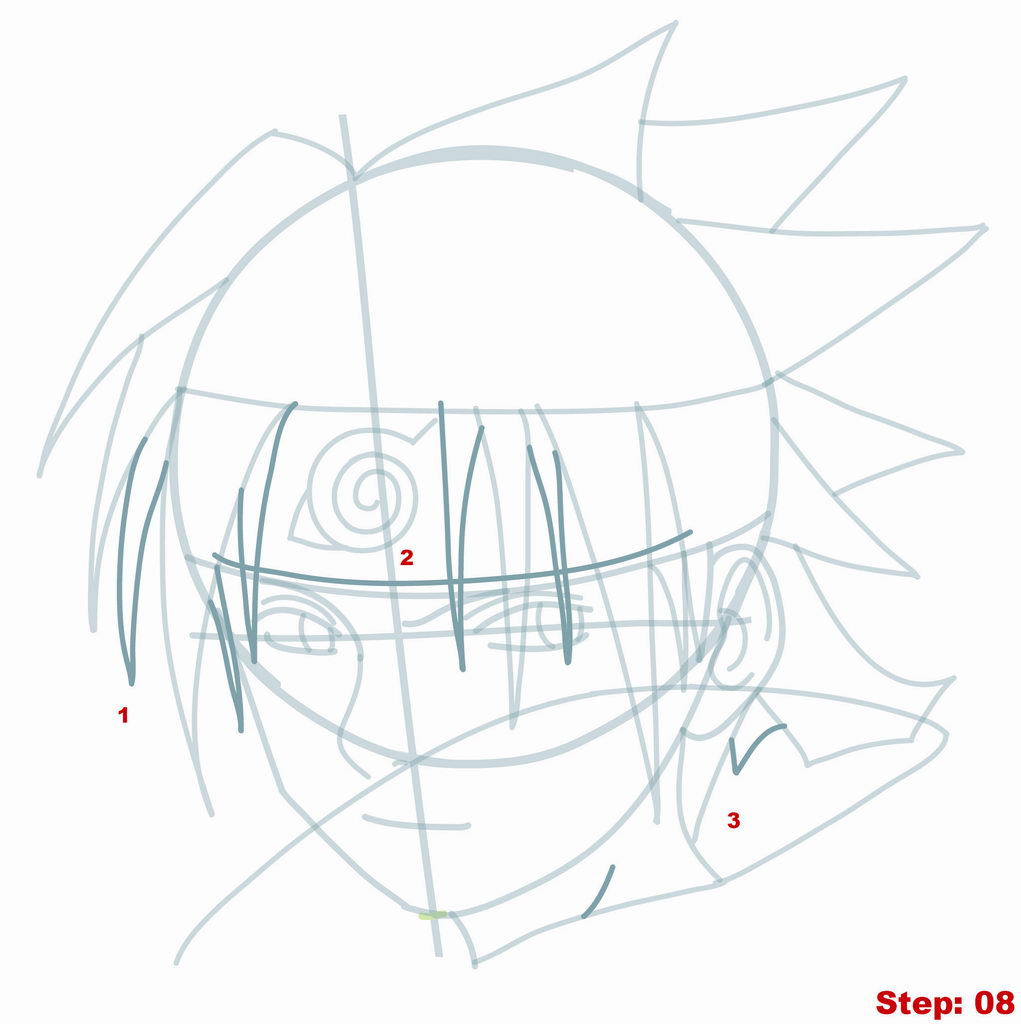
Step 8
Step 08: Here, we just need to add some detailing before we move on to our final lines. For area #1 we just need to add another hair spike on the left. In area #2, there are a number of small hair spikes to add. But first, let’s draw the line across the bottom of the headband just above the lower head band line. Then, we can add the two small hair spikes on the left and two on the right. The last one on the right will overlap the iris/pupil of the eye on the right. Then, in area #3 we should draw the small “v” like shape below the ear on the right and there’s a diagonal line on the neck to draw. That finishes up our construction lines!
Step 9
Step 09: Take out your eraser and lighten the construction lines we’ve made so far. Then, we’ll use our black pen or finishing pencil to trace our final lines.
Pro Tip 1: Just get a nice outline of your final lines in black first. Don’t worry about filling or line quality or anything yet. Just focus on a nice thin-lined outline.
Pro Tip 2: Even when tracing just your first outline there are a couple of spots to be careful about. Firstly, notice how the jaw line and the ear line become seamless. Secondly, in the jaw line on the right there’s a gap. There’s a similar small gap between the eyebrow on the left and the nose line. And, of course, the corners of the eyes should be left gapped.
Pro Tip 3: For now, don’t trace the Naruto symbol on the headband at all. We’ll do that in a future step. Once you have a nice thin outline in black, we’ll go back and work on line quality and filling.
Line Quality: This means that we want to go over some of our lines and make them thicker. This adds a nice 3D quality to our lines. I’ll note the lines I’ve thickened: mainly, the nose, it’s important to thicken this, also, the jaw line on the left where it bends and the jaw line on the right in the chin area. I’ll focus on the eyes in a minute.
Filling: For the moment, just fill in the hair and the back of the hood completely in black. Take a look at the next step for the eyes.

Step 10
Step 09a: I’ve zoomed in on the eye area for you so you can see in detail how to thicken and fill the eyes. As you can see we want the upper line of the eye to be quite thick. The eyebrows, too, should be thickened. Then, inside the eyes we’ll fill in the pupils completley in black. You’ll also notice there should be a black line of hair between the eyes and the bottom of the headband and that area should be filled in in black as well.

Step 11
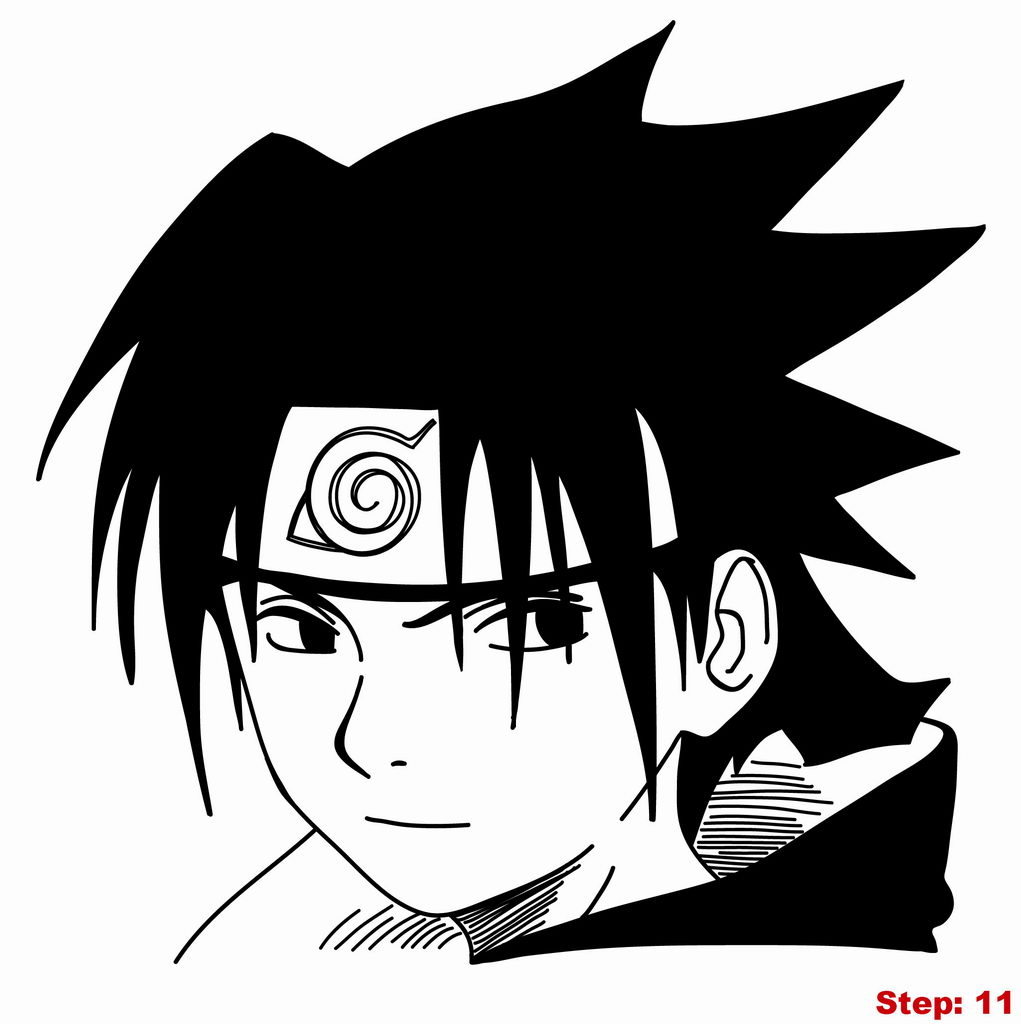
Step 10: Give your ink a minute to dry. You don’t want to have come this far only to smear your drawing. Then, take up your black pen again and we’re going to trace the spiral leaf Naruto symbol on Sasuke’s headband. We don’t want a solid spiral but rather very thin lines with a little space between them. Once you’ve got the symbol, let’s move down to the neck area where we will do some shading. We want to produce nice thin fairly straight black lines, so if you’ve got a ruler handy you can use it to get real straight lines. Otherwise, try your best. If you don’t feel comfortable drawing them freehand, you can always draw them in pencil as construction lines first and then go over them in black.


5 comments
Comments are closed.