
I hope everyone is ready to draw! Today I’m bringing you Tatsumi Oga from Beelzebub, a double request from users Beezlebub and Denz. Hope you guys like it! Oga is the main human protagonist in the Beelzebub manga who is chosen to raise Baby B. Despite not being able to be more than a few meters away from Baby B, babysitting the son of Satan sure does have its benefits, like super demonic powers for example. You forget the little things like changing diapers when you have to fight off various powers that want to destroy your baby ^_^. This tutorial is about average in difficulty, with some great hair drawing practice. You might want to have a ruler handy to help with the shading part at the very end of today’s tutorial. Feel free to post your own character requests by following the request tutorial link at the top of the page, but be sure to do a search using the search field at the top of the page before posting your request. Just to make sure we don’t already have the one you’re looking for. Let’s get our materials ready and learn how to draw Oga today.
Step 1
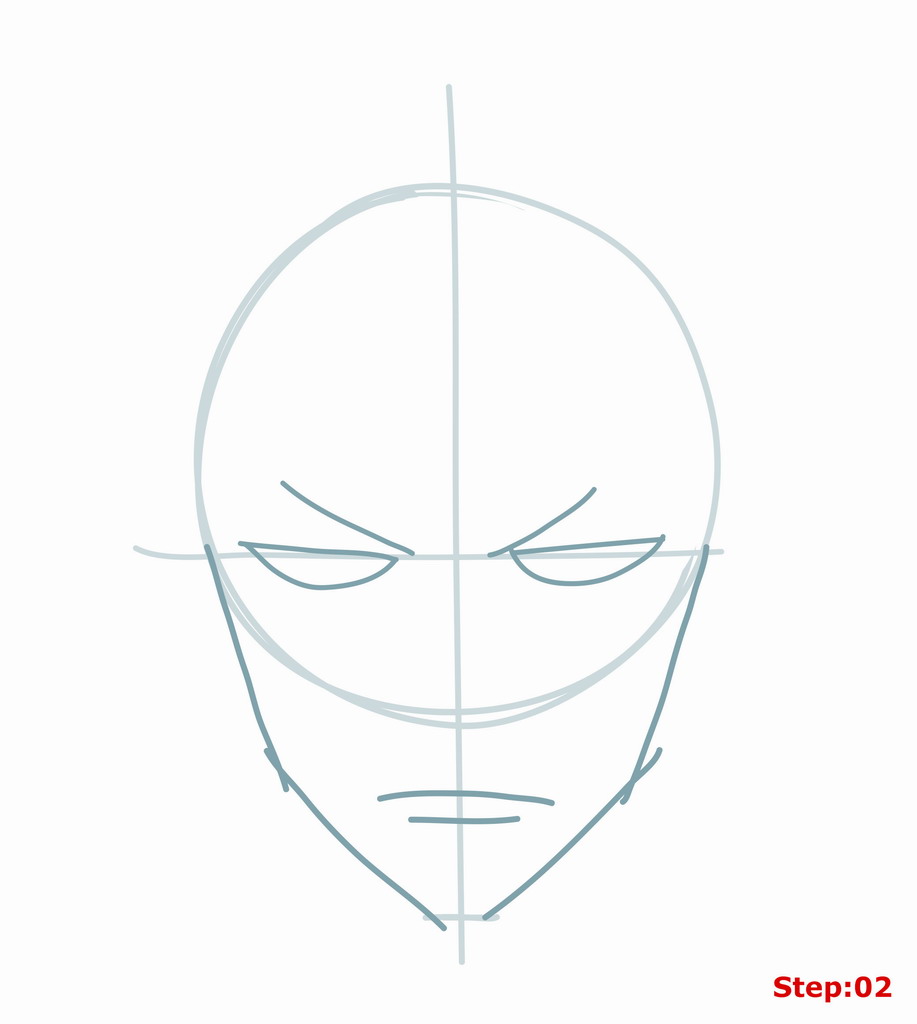
Step 01: Just a reminder to all of our mangakas that all of the blue lines you see in this tutorial are only construction lines and will be erased later on, so don’t press too hard on your pencil when drawing these lines. Our final lines you’ll see in black at the end of the tutorial.
We’ll start with our head circle, center and eye lines. The center line is vertical and divides the head circle in half. The eye line is a horizontal about a third of the way up the head circle.
Pro tip 1: Start with a large circle for the head in the upper center of your paper. Go around a few times to get a nice outline of a circle, as it can be quite hard to draw a circle free hand. Then trace your head circle over the outline you have made.
Pro tip 2: The center line should extend far below the head circle. Add a vertical dash at the end of the center line to mark where the chin will be, this’ll help in the next step. The distance between the chin dash and the bottom of the head circle is almost equal to the distance between the bottom of the head circle and the eye line.

Step 2
Step 02: Eye outline, mouth and jaw lines in this step. Begin by drawing the jaw which as you can see in the image above is made up of two lines on each side of the head starting at the eye line and ending on the chin dash we drew in the previous step. Pro tip: if you feel the chin is too flat or pointy or the cheeks are too angled you can always smooth them out when you trace your final lines at the end of the tutorial. Next, let’s draw the eyes. They’re long half circles that are titled up slightly at the ends. The inner corner of the eye closest to the center line will be on the eye line while the outer end is just above the eye line. Since we’re in the neighborhood, draw the diagonal eye brow lines as well. Lastly, we’ll draw the line for the mouth which turns down at the ends. And beneath that, the line for the lower lip.
Step 3
Step 03: Let’s do some more of Oga’s features and we’ll add the neck. We can start this step with the ears. Tip: Oga’s ears are differently shaped slightly. The ear on the right is more “c” shaped than the ear on the left which extends down in a more sloped line to touch the jaw. Inside each ear add the “?” shape and the half circle for the inner ear. When you’ve got Oga’s ears all done, move into the face and we’ll draw the nose. There’s the line just to the left of the center line. Then, just below the head circle line we’ll draw the upside down “^” shape and two dashes for the nostrils. Finally, to wrap up this step, draw the neck. Two lines off the jaw should do the trick, and we’ll add the muscle lines to the neck.

Step 4
Step 04: Great work so far, everyone! We’re going to zoom in on the eyes and ears and do some detail work in this step. The eyes are crucial for Oga’s look, so do your best to imitate the image above. We want to draw a another line for the top of the eyes and add the “u” shapes for the pupils. Just above the eyes we’ll draw a shorter line for the upper lid that just touches the eyebrow and then we’ll draw the checkmark shapes to get nice thick eyebrows. Then we’ll add the lines for the lower lids and wrinkles. Don’t forget to add the diagonal line over the eyebrow on the left. Inside the ears we’ll add a few more curving lines to give them some detail.

Step 5
Step 05: Oga’s really starting to shape up. Before we work on the hair, let’s add his shirt collar. It’s pretty easy. The collar is made up of two lines, an upper and lower collar line. And each of these is made up of two lines. Draw the collar and make sure that the lines overlap in the lower collar lines.

Step 6
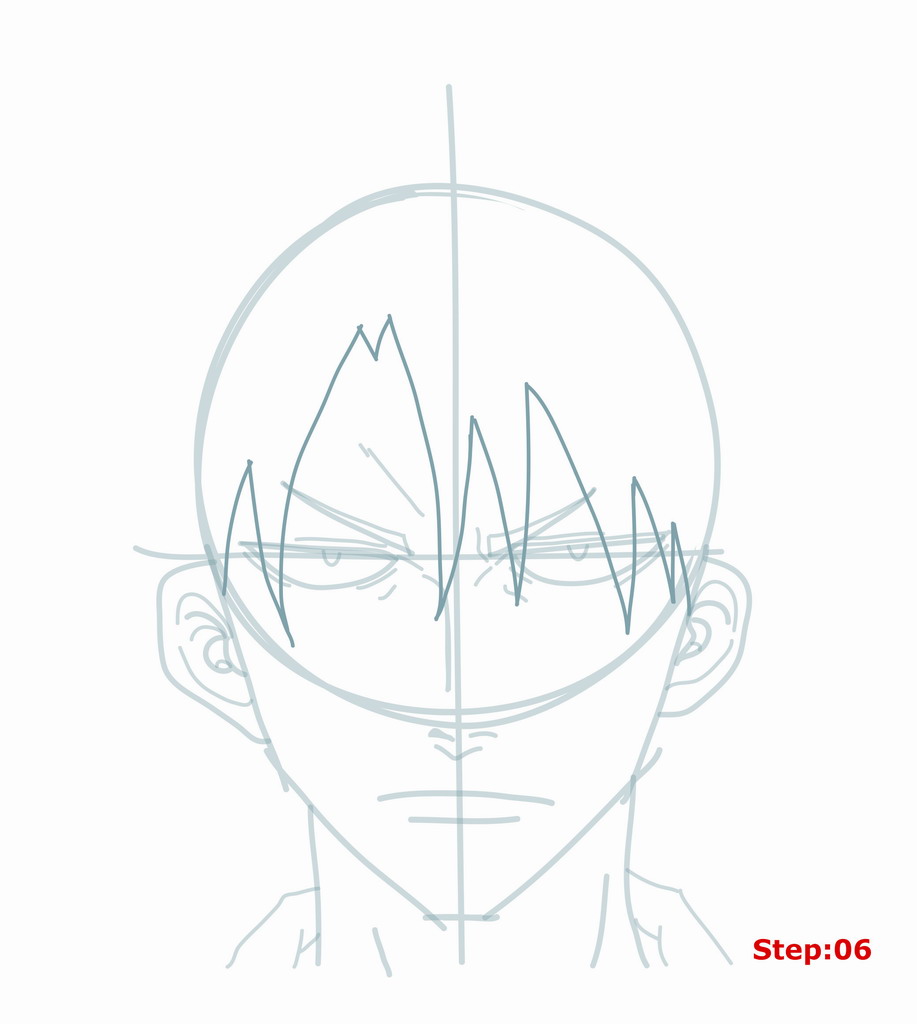
Step 06: Ok, mangakas, here’s a great chance to practice drawing hair. We’re going to be working on Tatsumi’s hair for the next three steps. Here in the first hair step, we’ll draw the bang line across the forehead and eyes. As you can see in the image above there’s a nice “M” like shape in the hair over the eye on the left. You might want to begin by drawing this “M” shape allowing it to overlap the left side of the eye on the left. Then from the bottom of the “M” on the left we’ll add one zig zag line till it touches the head circle. From the bottom of the “M” moving to the right we’ll draw a zig zag line that gets gradually smaller as we get closer to the right side of the head.
Step 7
Step 07: Now that we’ve got Oga’s bangs, we’ll do the hair spikes around the head using the head circle as our base. Pro tip: you’ll notice in the image above a straight line coming off the head in the upper right part of the head circle. That’s the part in his hair and it’s a great place to start. Everything to the left of that mark moves left and everything to the right moves right. So, starting from the part in the hair we’ll draw four hair spikes. Then, we’ll skip a little space and add one more hair spike over the ear on the left and two below the ear to touch the neck. Going back up to the part of the hair and moving right, we’ll draw four hair segments (3 are spikes) to the ear and then add one more below the ear that touches the top of his collar. And that’s it for this step.

Step 8
Step 08: We’ve reached the last hair step. And, as you can see, it’s kind of a messy one. Do your best to imitate the image above on your own. The general idea is to fill in the spaces that we left empty in the previous two steps and add some smaller spikes to make his hair more layered and fuller.
A few spots not to miss include: the space we left empty on the head circle in the previous step, we want a spike there; also, over the ear on the right, we want to connect the hair spikes above and below the ears with some hair lines; there are some small spikes covering the top of the ear on the left; and for the bangs, we’ll add some more lines and thin hair spikes that can overlap the eyes a little and don’t forget the two small dash marks under the arches of the “M” shape on the forehead. Pro tip: do your very best to imitate what you see in the image above. If you make any mistakes, don’t worry you can always add more lines in black.

Step 9
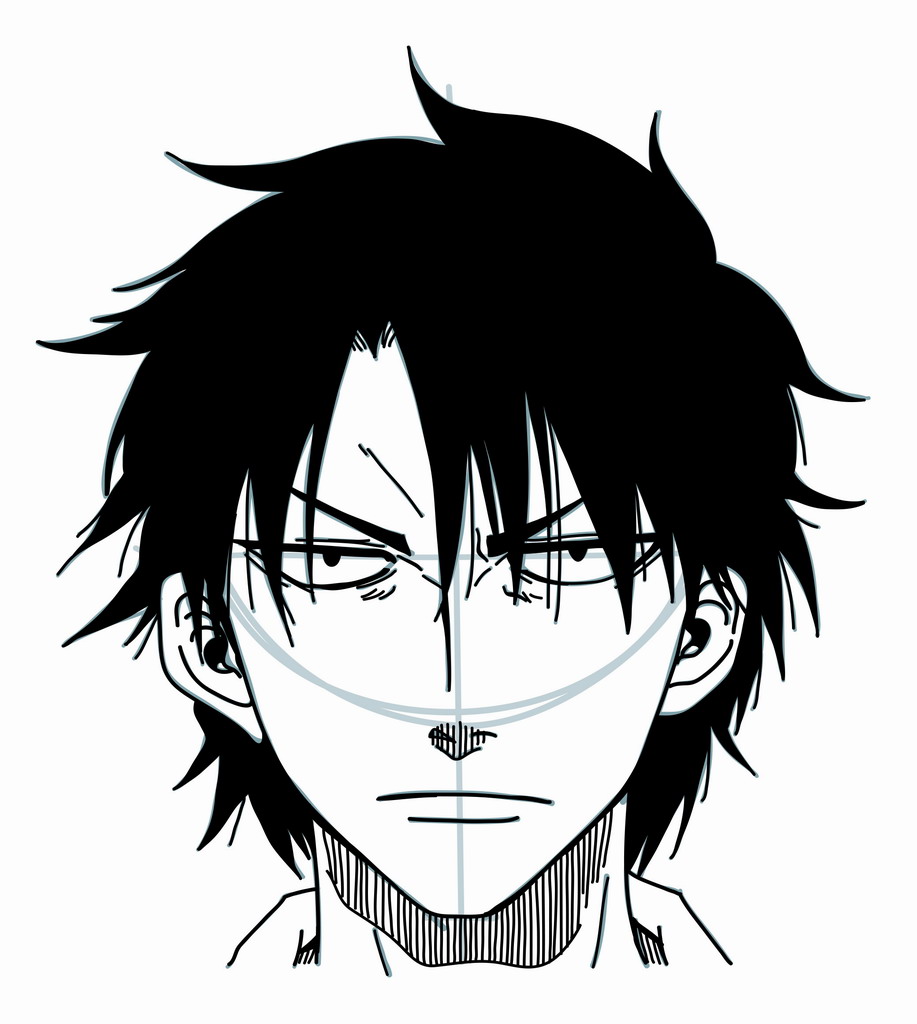
Step 09: That does it for our construction lines. Take out your eraser and lighten all of the construction lines you’ve made so far. Then using your black pen, trace out your final lines.
Pro tip: at first, don’t worry about line quality and filling. Just get a nice final outline in black first. Then, when you’ve got your final outline done, we’ll go back and work on line quality a little. Firstly, we want to thicken the jaw lines and the lower lines of the shirt collar. We also want to thicken the upper and lower lines of the eyes, especially the upper line. And, we’ll thicken the nose line that runs vertically. Then, still using our black pen, I’d start filling. Fill in the pupils, the eyebrows and then all the hair. We’ll also fill in the very middle of the ears.

Step 10
Step 10: When your ink dries completely, just use your eraser to erase any remaining construction lines that you can see.

Step 11
Step 11: Just before finishing up, I’d like to do a little shading. If you have a ruler handy it can help to make the lines nice and straight. Firstly, we’ll draw a squiggly line under the chin on the neck. Then, we’ll draw thin vertical lines (using our ruler, if possible) in black to get the desired shading effect. We’ll also do the nose area. Before finishing, I’ve added a few more “exhaustion” wrinkles just under the inner corners of the eyes.
Wait a few minutes for your ink to completely dry, and then take a look. You’ve drawn the devilish Tatsumi Oga from Beezlebub! If your goal is to become a great mangaka make sure to draw Oga again from memory. Then compare the final drawing with the original and correct any mistakes you might have made. Try once again from memory. This is the best way to build a huge library of shapes that you can use in the future for your own manga characters.
Draw with passion! -_^
Hiroshi


1 comment
Comments are closed.