

Click here for more Fairy Tail tutorials
Happy New Year to all of our new and returning mangakas! We’re kicking off 2013 with a great new Fairy Tail drawing tutorial, it’s Wendy Marvell requested by Mizaki Lim. Wendy is a very sweet, polite and shy girl … you’d have no idea she was raised by a dragon, but there you go. She was and she grew up to become a Sky Dragon Slayer. Pretty fierce for such a pretty girl ^_^ She’s a great character to draw for all levels. We’ll be doing some filling and shading at the end of today’s tutorial so you might want to have a ruler handy to do the shading parts. Learn how to draw all your favorite Fairy Tail characters by clicking on the Fairy Tail tag in the tag cloud on the right of the page. If we don’t have the character you’re looking for be sure to post a request by clicking the request tutorial button at the top of the page. Let’s get our materials ready and learn how to draw Wendy Marvell!
Step 1
Step 01: As all of our returning mangakas should know, all of the blue lines that you see in this tutorial are only construction lines and will be erased later in the tutorial. So, it’s a good idea not to press too hard on your pencil when drawing these lines.
We’ll begin today with our head circle, center and eye lines. Let’s draw a medium sized head circle in the upper center left of our paper. We need to be sure to leave enough space below for all of Wendy’s hair. As it can be tricky to draw a circle free hand, it’s a good idea to go around lightly with your pencil a few times to get a nice outline of a circle and then draw your final head circle on top of the outline.
Next, we’ll draw our vertical center line just to the left of center of the head circle. It will extend both above and below the head circle. Then, we’ll draw our horizontal eye line that’s about a quarter of the way up the head circle. Lastly, let’s add the dash towards the bottom of the center line as a guide for the jaw and chin. The distance between the bottom of the head circle and the dash is about the same as the distance between the bottom of the head circle and the eye line.

Step 2
Step 02: In this step, we’ll draw the eyes and jaw line. The eyes are nice vertical ellipses (taller than wide) on the eye line. After you’ve got those we’ll draw the jaw in two lines. From the left down to the chin dash and then back up to touch the head circle on the right. The chin can be fairly pointy.
Pro tip: Because we have Wendy posed with her head turned slightly to the left, we’ll see a bit more of the features on the right. So, for the jaw line, on the left it starts just outside the head circle at the eye line but on the right it stops just inside the head circle above the eye line.

Step 3
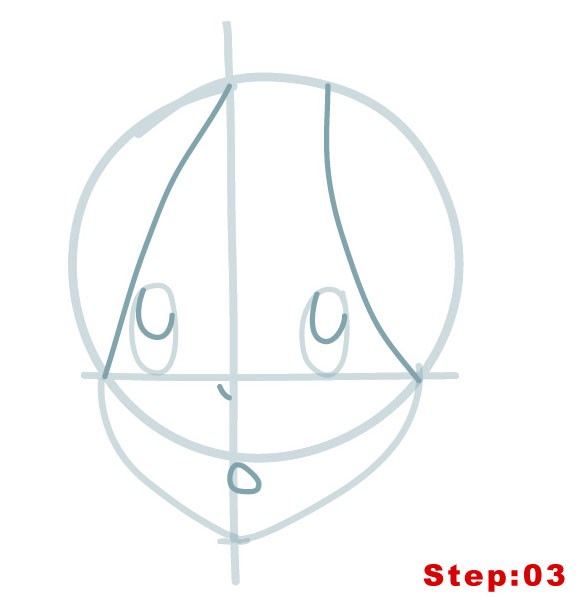
Step 03: We’ve got a pretty easy step here. Let’s begin inside the eyes where we’ll draw the “U” shapes in the top half of the eyes. Then, we’ll add the dash for her nose just to the bottom left of the intersection of the center and eye lines. Farther down just below the head circle and to the right of the center line we’ll draw the irregular “o” shape for the mouth. When you’ve got that, let’s draw the two lines for Wendy’s bangs (hair outline). On the left, the line is a fairly straight diagonal from the center line at the top of the head down to the eye line. On the right, the line is more curved and starts at the top of the head above the eye and goes down to the eye line. Got it? Great!
Step 4
Step 04: We’ll zoom in and do a little detail work on the eyes. To kick off, let’s draw the small “c” shapes in the upper right corner of the eyes. (These should be inside the “U” shape we drew in the previous step.) Then, just at the bottom of the eyes, on the eye line, we’ll draw the horizontal “(” lines for the lower lids. Above each eye, we’ll draw the lines for the upper lids.
Pro tip: the line for the upper lid of the eye on the right will be shorter than the one on the left. Before moving on, be sure to draw the two lines for the neck. The line on the left is shorter than on the right and is just to the left of the center line, while the line on the right starts higher up on the jaw line.

Step 5
Step 05: The remaining steps will all have something to do with Wendy’s hair, so let’s get cracking. Here we’re drawing some hair spikes for the bangs, then the hair outlines on the cheeks and the dashes under her eyes for whisker marks? nobody seems quite sure what those are for ^_^.
Pro tip: Begin in this step with the hair spike on the right of the center line. It starts at the top of the head on the center line. Then, add the hair spike to the left of that. Next, I’d do the line in between the hair spikes for a strand of hair and then the eyebrow lines between the hair spikes and the hair outline we already have. Don’t forget the wrinkle lines over the eyes that just touch hair spikes. Move on to do the vertical lines on the cheeks, covering more of her cheek on the right than left. And finally, add the dashes for the “whisker” marks.

Step 6
Step 06: Six lines to draw here, mangakas! Four for the hair, and two for the shoulders/body shape. The lines are irregular so do your best to follow the image above.
Pro tip: Start with the outer hair lines that begin above the head circle on the center line. First to the left and then to the right. Then add the lower hair lines that curve in at the bottom. Finally draw the lines for Wendy’s shoulders. Pro tip for the shoulder: notice that the shoulder on the left starts at the bottom of the neck line on the left but that the shoulder on the right starts at about the middle of the neck line on the right. The line on the right is also longer than the one on the left.

Step 7
Step 07: More hair in this step, also ears and the collar of Wendy’s shirt. We’ll go from top to bottom in this step, beginning with the ears. We need a triangle shape on either side of the head in the hair. Pro tip: these are not perfect triangles, but a little curved. Also, you’ll notice that the corners of the ears that are closest to the center line actually touch the line that makes the outer hair shape. Next, moving down to the neck, draw the collar. It’s made up of two irregular ellipse shapes in the corners of the neck and a horizontal line between them. Then on the shoulders, add the hair spikes.
Pro tip: There should be just two hair spikes on the right, but there are many on the left. Now, we’ll jump down to the ends of the outer shape where we’ll connect the two lines together using a fork on the left. On the right, we’ll also fork the bottom of the hair shape but we’ll add an extra hair spike. So the end of the hair on the left should have 2 and the end of the hair on the right should have three spikes. Lastly, we’ll draw the line connecting the shoulder on the left to the outer hair shape. On the right the line starts lower at the bottom of the torso shape we drew and stops higher up on the hair shape (approx. just above the eye line).

Step 8
Step 08: Just focus on the ears for a minute. We’ll draw the upside down “u” shape in the bottom outer corners of the ears and then connect the “u” to the top point of the ear with a line. All the rest of the irregular shapes you see in the hair are for reflection spots. These are the areas of the hair that we want to leave empty and white in our final drawing and really help to give Wendy a more 3D feel. So be sure to add them and do your best to follow the image above as a guide.

Step 9
Step 09: We’re nearly there! Time to trace our final lines and do some filling. You might want to begin by lightening the construction lines you’ve made so far with your eraser and then begin to trace your final lines.
Pro tip 1: Hair – the best way to do the hair is to trace all of the reflection spots first and then fill in the rest of the hair in black with your pen.
Pro tip 2: Line quality – We want the lines for the upper lids to be quite thick on Wendy so you might need to go over them to thicken them up a bit. Also we want the top part of the mouth to be a little thicker too.
Pro tip 3: Eyes – I’ve already mentioned the line quality for the upper lids. Well, we also want the eyes to be thick but not as thick as the upper lids. We will want to fill in the space between the “U” shape and the “c” shape in the eyes in black. But there’s a small part of the eye where the “c” shape is that we want to leave empty. And, of course, the whole area of the “c” shape in the eyes should be left empty.

Step 10
Step 10: After your ink dries just take out your eraser and completely erase any construction lines that you can still see. We’ve got a pretty good Wendy but I’m going to add one more step with a little shading.

Step 11
Click here for more Fairy Tail tutorials
Step 11: You might want to have a ruler handy for this step as we want the shading lines to be straight diagonals. So I’ve added diagonal shading lines to Wendy’s eyes below the “u” shape and on the neck under the chin on the left side. Pro tip: we want to leave a tiny white spot in the middle of both eyes just under the “U” shaped pupil. So when tracing your shading lines leave a little break there.
When your ink has dried, take a step back and you’ve just drawn the delightful Wendy from Fairy Tail!If your goal is to become a great mangaka make sure to draw Wendy again from memory. Then compare the final drawing with the original and correct any mistakes you might have made. Try once again from memory. This is the best way to build a huge library of shapes that you can use in the future for your own manga characters.
Draw with passion -_^
Hiroshi


4 comments
sry for my bad english… 🙁
Comments are closed.