
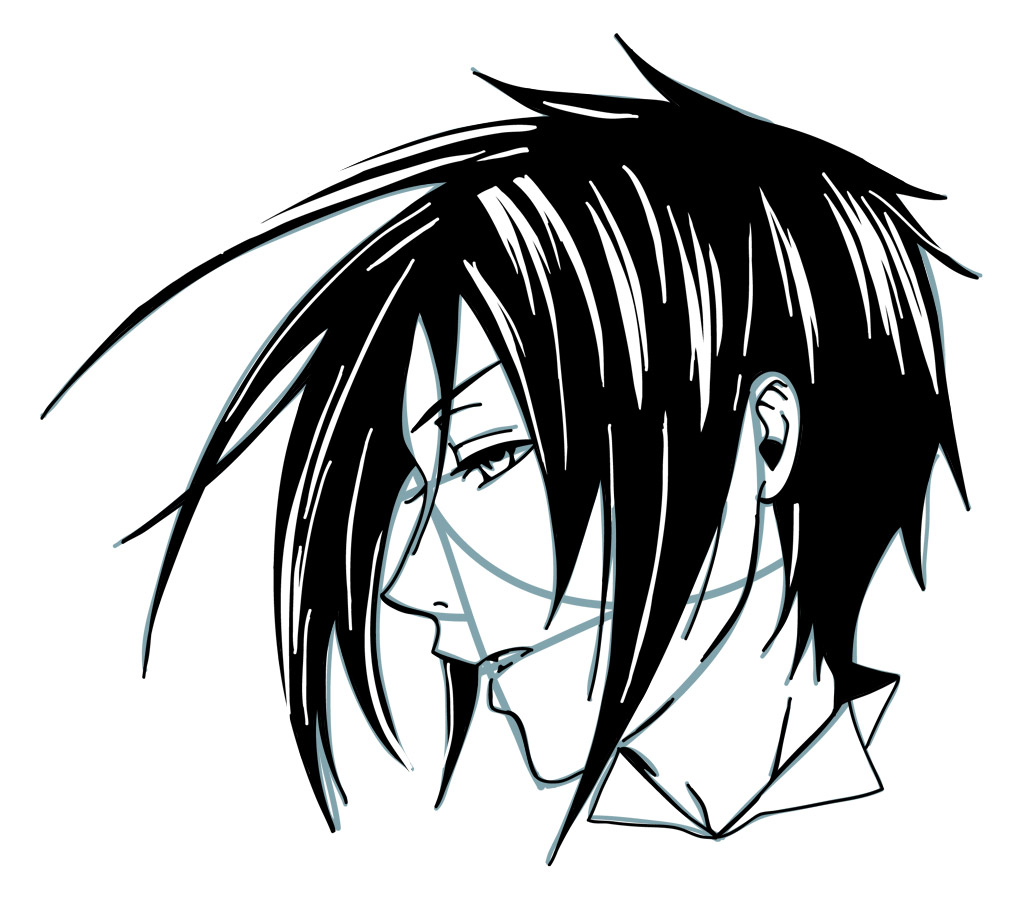
Welcome back, Mangakas! Today on How to Draw Manga in 3D our drawing tutorial is on Sebastian Michaelis from the Kuroshitsuji Manga. Although he always dresses impeccably and has the outward manner of Jeeves, Sebastian is anything but your ordinary butler. An evil demon who has sealed a Faustian bargain with his master Ciel, Sebastian is simply evil through and through. Better not complain about the tea, or your soul just might end up being consumed by this demon servant. We’ll be drawing just Sebastian’s head today in profile.
Sebastian’s head and features are pretty easy to draw but it’s his hair that gives me the most difficulty. As we’ve mentioned before, Manga character hair can be really difficult to draw so it’s really important to spend time practicing drawing the hard hair shapes and spikes. We’ll get plenty of practice in this tutorial. If you’d like to learn how to draw other Kuroshitsuji characters just click on the Kuroshitsuji tag in the tag cloud on the right for all of our Kuroshitsuji drawing tutorials. Let’s get our materials ready and learn how to draw Sebastian!
Step 1
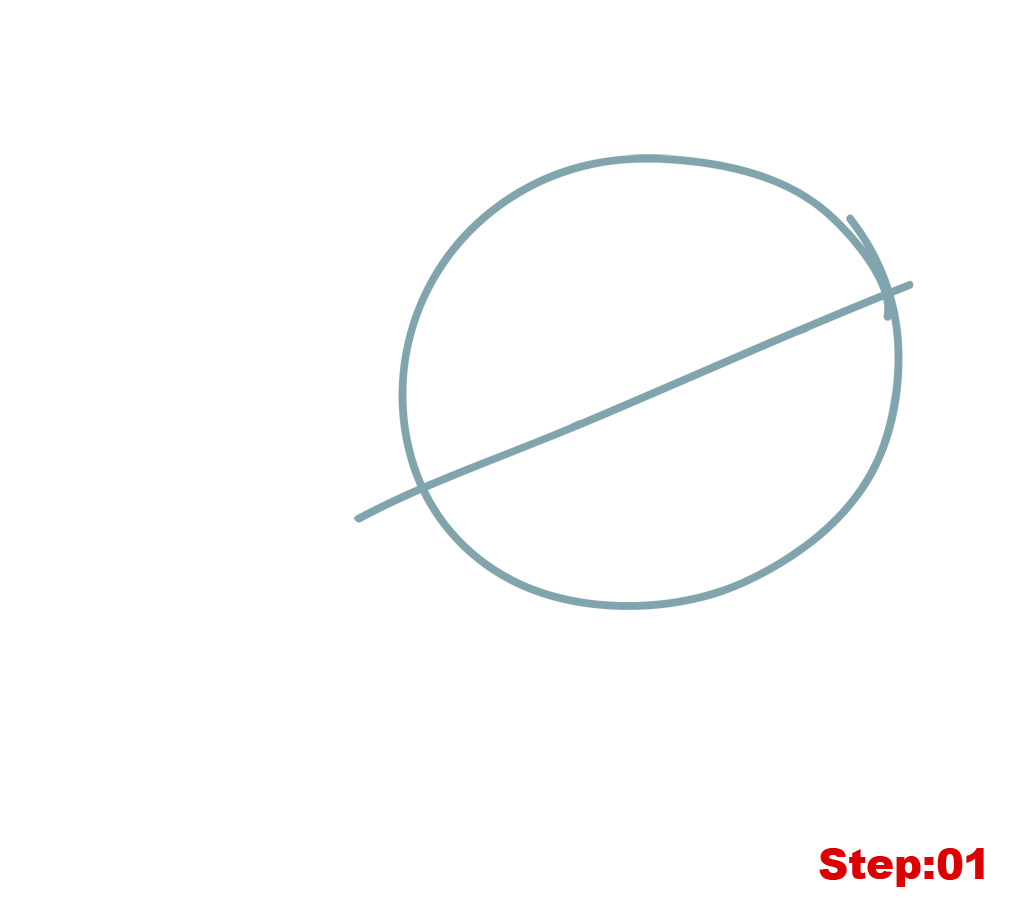
Step 01: As all of our returning Mangakas will already know, all of the lines you see in blue in this tutorial are only construction lines which we’ll be tracing over and erasing in later steps. So, it’s important not to press too hard on your pencil when drawing these lines. Our final, permanent lines you’ll see in black towards the end of the tutorial.
Let’s begin with our head circle and eye line. We don’t need to draw a center line since we are drawing Sebastian in profile. We’ll start with a slightly squashed circle (slightly longer than tall) for our head circle. It’s usually tough to draw a good circle free hand so I’d recommend going around several times very lightly with your pencil to get an outline of the shape and then drawing your final head circle construction line on top of your circular outline. After you’ve got your head circle in the center right of your paper, let’s draw the eye line which is a diagonal line starting on the right about three quarters of the way up the head circle and extends slightly beyond the edge of the circle on both sides.
Step 2
Step 02: For this step, we have to draw a quarter circle on the eye line for Sebastian’s jaw. From where the eye line intersects the head circle on the left, we should draw a perpendicular line down and then curving back up to touch the eye line in middle of the head circle.

Step 3
Step 03: Just a few construction lines for the face in this step. We can start with the ear by drawing a cup handle shape on the curving jaw line just below the eye line. Then, we’ll draw a “^” shape for the nose on the perpendicular. Notice, though, that the bridge of the nose should be longer than the underside of the nose. Lastly, we’ll add a straight line for the mouth the touches both the perpendicular and the head circle. Got it? Great, let’s move on.

Step 4
Step 04: The mouth in this step can be a little tricky. Let’s start with the eye. We’ll draw a thin, incomplete leaf shape for the eye with the top of the eye just on the eye line. Then, we can draw the boxy “U” like shape under the head for Sebastian’s neck noticing how the line for the back of the neck curves out slightly and stops on the head circle on the right. Lastly, we can work on the mouth, lips and chin using the straight line we drew in the previous step as a guide. Give it a shot and see how you do keeping in mind that the upper lip line actually starts just on the bottom of the nose, the mouth is open slightly, and the bottom lip/chin is more curved compared to the angular upper lip and mouth. Once you’ve got it to your satisfaction we’ll move on.

Step 5
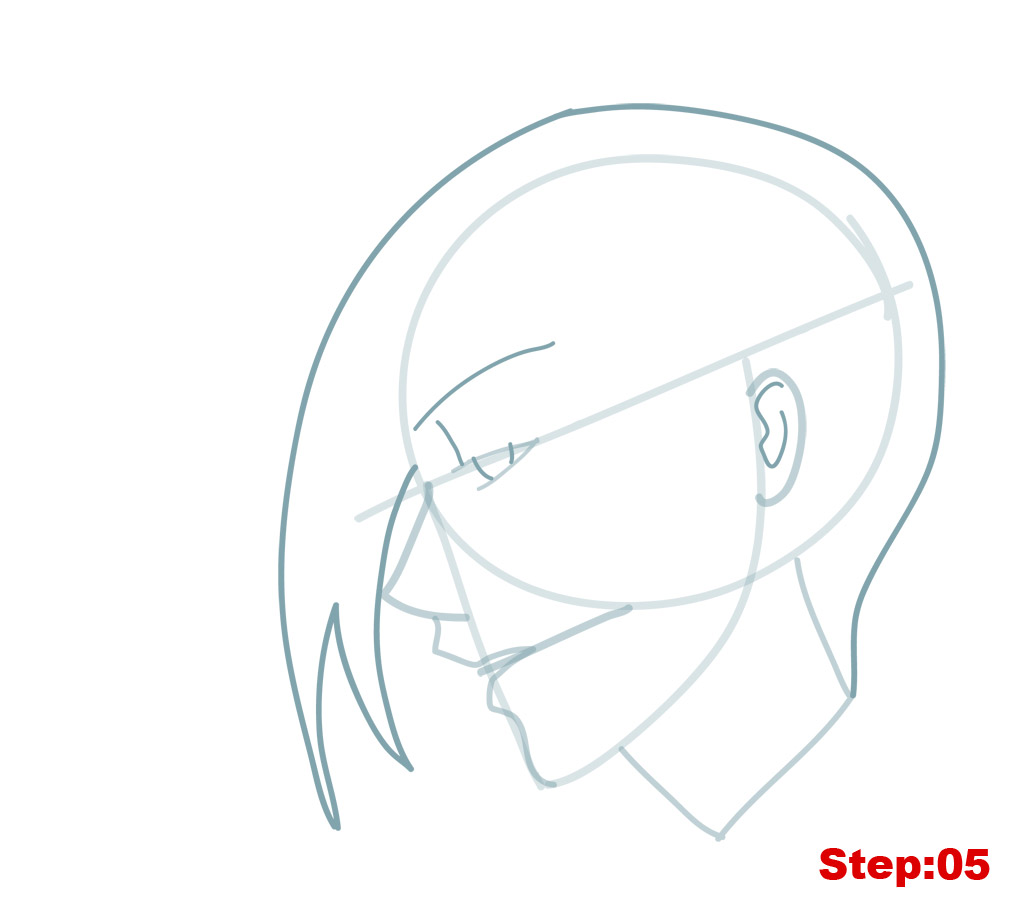
Step 05: Ok, mangakas, time to begin the hair! We have to draw the forked hair spike in the front that curves all the way back to touch the very bottom of the neck. The hair fork should start just above the eye line on the head circle and touch just the tip of Sebastian’s nose. After you’ve got the major hair shape in place, there are a few detail lines to draw here. Let’s add the squiggle to the inside of the ear. Next, we’ll draw two lines inside the eye for the iris. Above the eye we should draw a long, thin line for his eyebrow. And, lastly, a vertical line from the top of the eye that nearly touches the eyebrow. When you’ve got all that, we’ll move on to some more detailing.
Step 6
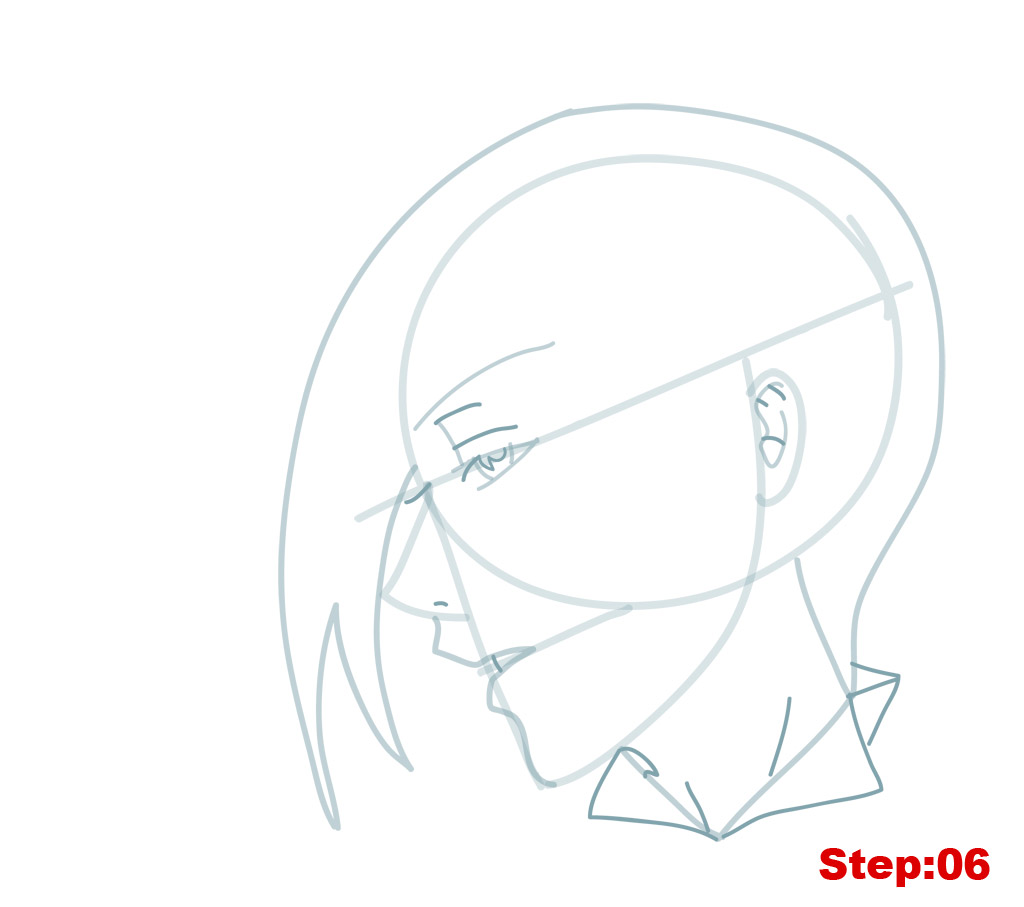
Step 06: We’ll start with a few details in this step and then draw the collar to Sebastian’s shirt last. Begin by drawing two horizontal lines on the vertical line below the eyebrow. The upper line will be shorter than the lower line. Then, add a short curved line just where the eye line and head circle meet for the eyelash to the eye that is hidden from our view just behind his nose. Then, we’ll need to add the irregular line, it’s kind of a sharp squiggle or zig-zag inside the eye for his demon mark. There’s a small dash in the nose for his nostril and a short line between the lips for his teeth. Then, there are a few dash marks inside the ears for some detail. Once you’ve got all that, we can move down and work on the neck and shirt collar. If you look closely, you’ll see that the collar is made up of 4 triangles. So draw a triangle on the two flat sides of the neck square with the triangle on the left not having a perfectly straight base, and then we’ll add two smaller triangles on the right at the back of the hair. Before moving on, draw a line on the neck to suggest the neck muscles.
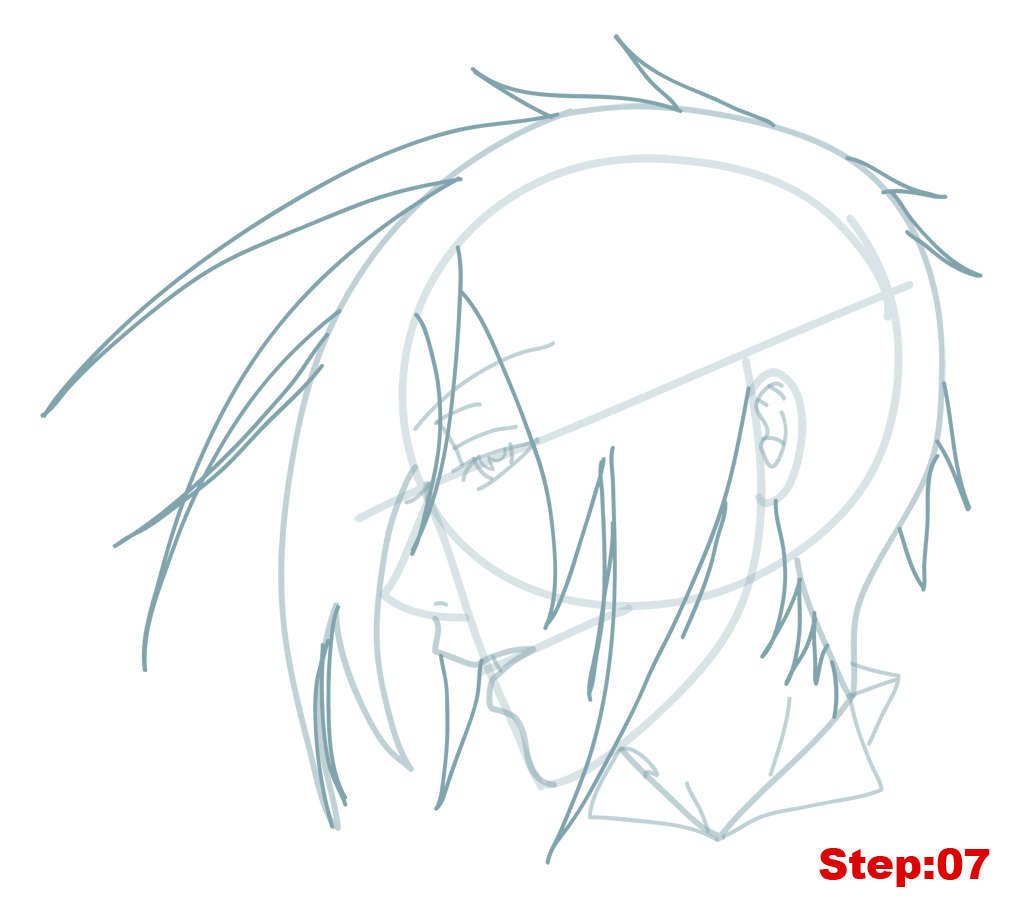
Step 7
Step 07: Ok, mangakas, here’s the step you’ve all been waiting for — hair, hair and more hair. Sebastian has lots of thin long and short spikes sticking out from his head. And there’s really no 100% perfect way of drawing his hair. You can do your best to follow my outline or come up with something a little different on your own. A few pointers can help though. Firstly, starting near the ear and covering most of Sebastian’s cheek are two large hair spikes. There’s a third, smaller spike near the forehead area that overlaps some of the eyebrow and eyelid. I’ve also drawn three long and thin hair spikes on the top/front of his head and six more smaller spikes moving around the head towards the back. There’s also a hair spike that extends down from his upper lip (it’s actually behind the nose, with the bottom sticking out). And there are some spikes from the bottom of the ear along the back of the neck to the shirt collar.
Step 8
Step 08: Whew! We’ve got all of our construction lines in place. So let’s take our eraser and lighten the lines we’ve made so far before taking up our pen and tracing out our final lines. It’s important to remember that as you trace your final lines we shouldn’t trace any line we don’t want to see. So anything that is hidden behind the nose or under the hair we won’t trace as it should be hidden. After you’ve got your first trace done, we’ll work on shading and line quality in the next few steps.

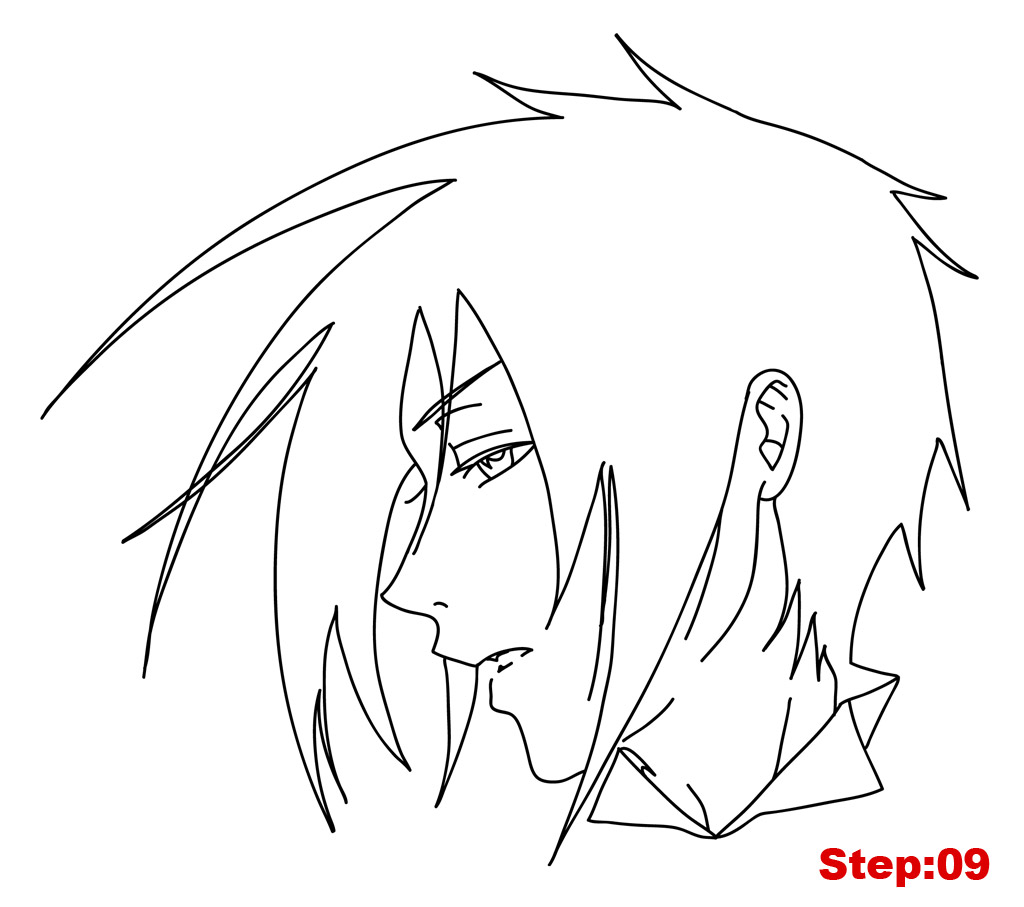
Step 9
Step 09: Before moving on to work on line quality and filling in some areas, let’s completely erase any remaining construction lines that we can see. We could stop here with a pretty good-looking Sebastian, but I think we can make him look even more 3D. So let’s continue.
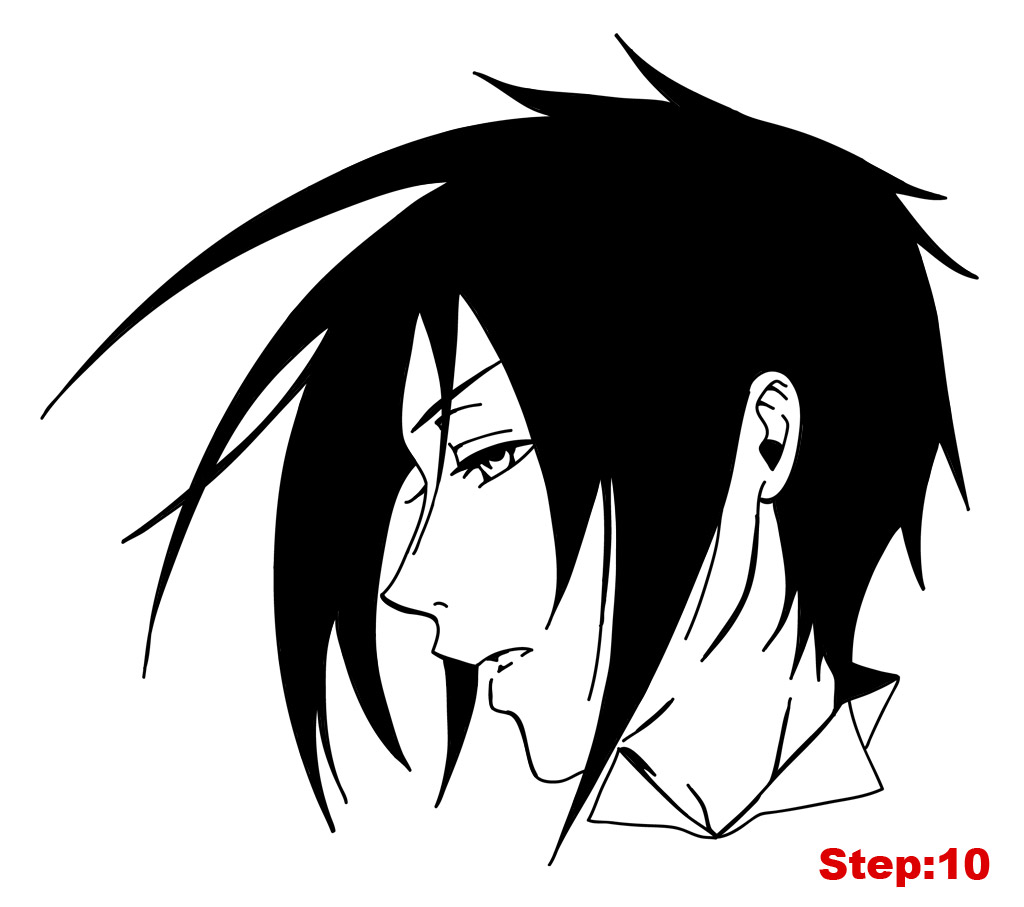
Step 10
Step 10: Let’s start by working on our line quality by thickening some of the lines we’ve already traced. I’ve thickened the eyebrow and the jaw and neck lines slightly to give them some added depth. Then, I’ve filled in the upper part of the eye, including the demon mark. I’ve also filled in the spot inside Sebastian’s ear at the bottom. Now, if you plan on adding the highlights and reflection points to Sebastian’s hair then I’d recommend just filling in the hair in a dark pencil. If you’re using a drawing software program, it’s no problem for you to create another layer to add the highlights, but if you fill in the hair in pen it won’t be possible to add the highlights in the next step. You can, of course, just stop here and have a great looking Sebastian.
Step 11
Step 11: If you’re using pencil to fill in the hair, then just take out a sharp eraser and erase a few areas to create the hair highlights. In a drawing program, just create a new layer to add the highlights. When you’ve got the hair done to your satisfaction, stand back and take a look at Sebastian from Kuroshitsuji! If your goal is to become a great mangaka make sure to draw Sebastian again from memory. Then compare the final drawing with the original and correct any mistakes you might have made. Try once again from memory. This is the best way to build a huge library of shapes and get the tracing experience necessary that you can use in the future for your own manga characters.
Draw with passion! -_^
Hiroshi


7 comments
Comments are closed.